
The following points highlight the top twenty-one techniques of plant chromosomes analysis. Some of the techniques are: 1. Study of Meiosis in Plant Material following Aceto-Carmine Smear Technique 2. Study of Mitosis in Plant Material following Aceto-Orcein Squash Technique 3. Study of Karyotype in Plant Material following Aceto-Orcein Squash Technique and a few others.
Techniques of Plant Chromosomes Analysis:
- Study of Meiosis in Plant Material following Aceto-Carmine Smear Technique
- Study of Mitosis in Plant Material following Aceto-Orcein Squash Technique
- Study of Karyotype in Plant Material following Aceto-Orcein Squash Technique
- Method of making Temporary Slides Permanent
- Schedule for Feulgen Stain
- Study of Meiosis following Dry Smear Technique and Crystal Violet Staining
- Schedule for Aceto-Orcein Squash of Leaf-Tip
- Schedule for Demonstration of Spiral Nature of Chromosomes
- Schedule for Demonstration of Orcein Breakage of Chromosomes
- Schedule for Pollen Tube Staining
- Schedule for the Study of Pollen Mitosis
- Schedule for Demonstration of Banding Pattern with Orcein Staining
- Schedule for Determination of Percentage of Pollen Sterility
- Schedule for Karyotype Analysis
- Schedule for Determination of Chiasma Frequency
- Schedule for Pyronin Methyl Green Staining
- Schedule for In Situ localization of Alkaline Phosphatase Activity
- Schedule for Study of Mitotic Index
- Schedule for Study of the Effect of Chemicals on Chromosomes: Allium Test
- Schedule for the Study of Effect of Ionizing Radiation on Chromosomes
- Schedule for Nucleolar Staining in Plant Cells
Technique # 1. Study of Meiosis in Plant Material following Aceto-Carmine Smear Technique:
In higher plants meiosis occurs in pollen (microscope) mother cells which are present in the anthers and also in the megaspore mother cell which lies within the ovule.
An ovule contains only one megaspore mother cell surrounded by several layers of vegetative cells; as such, it is rather difficult to work it out. Anthers, on the other hand, contain large numbers of pollen mother cells (PMC) which can be very easily exposed by bursting the anthers. So, usually, meiosis is studied from pollen mother cells.
Meiosis occurs only once in the life cycle of an organism and it takes only a couple of hours for meiosis to be completed. Diakinesis, metaphase I (polar view) and metaphase II (polar view) are the ideal stages for counting the chromosome number of an organism.
Hence, to work out the suitable stages of meiosis, flower buds of appropriate size are to be selected; otherwise the stage would be either too early or too late. Bud selection can be done only on trial-and-error basis.
Take a flower bud of suitable size. Dissect out 2 to 3 anthers with a needle and transfer them onto a clean grease-free slide. Put 1 or 2 drops of 1 % Aceto carmine solution on them. Gently press them with an iron scalpel to squeeze out their contents. Put a cover glass.
Tap very gently to scatter the cells so that they form an one-layered smear. Observe under a microscope. If the stain appears very faint then warm the slide gently by running it 2 to 3 times over a flame. Blot off the excess stain and seal with paraffin (Fig. 2.1).

If anthers are smeared with an iron scalpel then a little iron acetate is formed — it helps in staining. Tapping on the cover glass should be done very carefully. PMC walls are very fragile and excess pressure will break them and, conversely, too little pressure will cause the PMCS to remain in a lump. After squeezing out the contents of the anthers, the anther walls may be thrown off.
Meiosis usually occur during the daytime. 11 a.m. to 2 p.m. is the ideal time for working out meiosis. It is easier to find meiotic stages on bright sunny days than on cloudy and rainy days. While working out meiosis, the inflorescence stalk should be kept dipped in water, but the buds should not be kept immersed.
If buds are collected in the field, they may be fixed in acetic-alcohol (1: 1 or 1: 2) for 24 hours and then preserved in 70% alcohol for any length of time. The buds may also be kept in acetic alcohol for 2 to 3 days, in which case they should be treated with 45% acetic acid for about 5 minutes just before smearing (Fig. 2.2).

Technique # 2. Study of Mitosis in Plant Material following Aceto-Orcein Squash Technique:
Mitosis occurs in all meristematic cells. So it can be worked out from root tips, shoot tips, young leaf primordia, cambium, growing floral and fruit parts etc. Of all these organs, root tips are the most actively growing parts, so root tip is the ideal region to study mitosis.
Besides, root tip cells have very little ergastic matter and this makes staining easier. For the demonstration of the different stages of mitosis, root tips of Allium cepa are the most ideal material.
Bulbs of onion are taken, the outer surface of the disc (stem) is scraped with a scalpel to remove the remnants of old roots and are placed in a pot containing moist sawdust and soil. Within 2 to 3 days, roots come out. Take fresh and healthy root tips, wash thoroughly in water to remove all dirt and cut out the exact tip portion (about 5 mm).
Fix the root tips in acetic-alcohol (1 : 1) in a specimen tube for 1 hour. Transfer the root tips into a mixture of 2% Aceto-orcein and normal HCl (9 :1) and heat gently for a few seconds, without boiling. Keep the root tips in the mixture for 15 minutes to half an hour.
Transfer a root tip onto a clean and grease-free slide, cut out the exact tip portion (about 2 mm) add a drop of 1 % Aceto-orcein solution, cover with a cover glass, squash by applying hard and uniform pressure, bolt off the excess stain with blotting paper, seal with paraffin and observe under a microscope. Draw and label the various mitotic stages (Fig. 2.3).

During pre-treatment and fixation, penetration of chemicals occurs mainly through the cut surface of the root; hence the root tip should be made sufficiently short (about 5 mm).
For staining root tips are gently heated in a mixture of 2% Aceto-orcein and normal HCl. Orcein stains the chromosomes and HCl dissolves the middle lamella. Middle lamella — the cementing materials — lying between cells — is made of mainly calcium pectate and magnesium pectate.
When treated with HCl it dissolves as pectic acid. And now, when pressure is applied, the cells separate from one another and form a one-layered smear. Heating quickens the staining and middle lamella dissolving reactions. It is better to heat less than overheating; because over-heating will break the chromosomes into fragments.
For squashing, the root tip should be made very small (about 2 mm or less). In the root tip the root cap region is followed by the cell division region and then by the cell elongation region. If the root tip is relatively long then some of the elongated cells will come. This will unnecessarily crowd the preparation and thus making it difficult to get a one-layered smear. The pressure applied should be hard and uniform.
In case of flower buds the pressure should be gentle, because hard pressure will break the fragile pollen mother cell walls. But in case of root tips pressure should be hard enough to loosen cell mass and form an one-layered smear. Moreover, the cells have to be flattened, so that the chromosomes are well- scattered (this point is more important for the next schedule of treatment).
The best way to do it is: Place the slide on a blotting paper, fold the blotting paper so that the slide remains within it; now tap with the blunt end of a needle, blot off the excess stain, move the slide slightly to one side and apply further pressure by the nail of the forefinger or the thumb or the blunt end of a needle. If the cytoplasm becomes stained, squash in 45% acetic acid.
Technique # 3. Study of Karyotype in Plant Material following Aceto-Orcein Squash Technique:
Karyotype is the entire chromosome complement of a cell i.e., of an organism. Karyotype study includes the determination of chromosome number together with their morphology, i.e., the length of the chromosomes, the number and position of constrictions, etc.
For this, well-scattered metaphase plates are necessary, as metaphase chromosomes are the shortest and thickest. Metaphase chromosomes are difficult to study as they remain crowded at the equator of the metaphase spindle.
The method of working out a karyotype is exactly the same as described in Schedule II, the only difference is that fixation is preceded by pre-treatment. The method of pre-treatment and fixation varies from plant to plant.
The methods for some classwork materials are given:
1. Root tips of Allium cepa (onion) and Allium sativum (garlic).
Pre-treatment:
The root tips (about 5 mm) are pre-treated in saturated aqueous solution of para dichlorobenzene (PDB). The PDB solution is kept in the ice-chamber of a refrigerator for some minutes in order to chill it. The root tips are put in the chilled PDB solution and further chilled in the ice-chamber for 10 minutes. They are then kept at 10°-14°C for two and a half hours.
Alternatively, the root tips are pre-treated in 0.5% aq. solution of colchicine for 3 hours at room temperature.
Fixation:
The root tips are now fixed in acetic: alcohol (1: 1) for 1 hour at room temperature.
Staining:
Staining is done according to the previous schedule (Schedule II) followed by slide preparation as in Schedule II.
Locating Well-scattered Metaphase Plates:
The slide should be observed under the low power objective. The peripheral cells should be specially noted. Wherever a good metaphase plate is observed it should be seen under the high power objective to ascertain whether it can be drawn.
2. Root tips of Lens esculentus (lentil), Ciceraerietinum (gram), Lathyrussativus (vetch) etc.
Pre-treatment:
Pre-treatment is done in saturated aq. soln. of aesculin for 1 hour at 8°-10°C.
N.B.:
For plants with short chromosomes aesculin is a good pre-treating agent.
Fixation:
Fixation is done in acetic: alcohol (1: 2) for 1 hour.
N.B.:
Higher amount of alcohol enables the dissolution of the relatively larger amount of ergastic matters, particularly fat, which is usually present in dicot roots.
Staining:
Staining is done in the usual way.
3. Root tips of Aloe indica, Vicia faba (broad bean) Nigella sativa (black cumin) etc.
Pre-treatment:
Pre-treatment is done in saturated aq. soln. of Para dichlorobenzene at 10°-14°C, for 3 hours.
N.B.:
Para dichlorobenzene and colchicine are good pre-treating agents for plants with long chromosomes, such as members of Liliaceae and Amaryllidaceae.
Fixation:
Fixation is done in acetic: alcohol (1:1) for Nigella and Vicia, 1: 2, for 1 to 2 hours. Staining
Staining is done in the usual way (Fig. 2.4).

Technique # 4. Method of making Temporary Slides Permanent:
Carmine, orcein, feulgen etc. preparations are temporary. These preparations can be kept for 1-4 weeks if they are sealed perfectly and stored in a cool place.
However, these slides can be made permanent in the, following ways:
Method I:
Remove the paraffin seal from the slide carefully with a blade or scalpel. Invert the slide in a petri dish containing glacial acetic acid — absolute ethyl alcohol (1 :1) mixture and keep till the cover-glass is detached. Place a glass rod in the petridish and rest the slide on it. Keep the petridish covered. If the cover glass is not detached within 15 minutes then prick it with a needle to detach it.
Keep the slide in this mixture for a couple of minutes after the cover glass is detached to remove the excess stain present in cytoplasm. If this is not done then within a few days the cytoplasm becomes so red that the chromosomes cannot be clearly differentiated.
Transfer the slide or the cover glass or both (to which the material is attached) to absolute ethyl alcohol and keep for 10 minutes. Pass through absolute ethyl alcohol — xylol (1: 1) mixture and xylol I and II grades, keeping in each for 10 minutes. Mount in Canada balsam, euparol or DPX mountant and dry on a hot plate (37°C).
Method II:
Remove the paraffin seal and invert the slide in glacial acetic acid — n-butyl alcohol mixture (1:1) till the cover-glass is detached (see Method I). Pass through alcohol I and II grades, keeping 20 to 30 minutes in each. Mount in euparol or DPX mountant and dry on a hot plate.
Technique # 5. Schedule for Feulgen Stain:
Theory:
Feulgen stain developed by Feulgen and Rossenback in 1924 is specific for DNA. The dye component used — a chloride of para rosaniline — is known as basic fuchsin.
It is prepared by boiling together small amounts of aniline, p-toluidine and mercuric chloride and then adding the mixture to 70% ethanol. After preparation (described before) this basic fuchsin forms a colourless solution which is called lucobasic fuchsin or Schiff’s reagent.
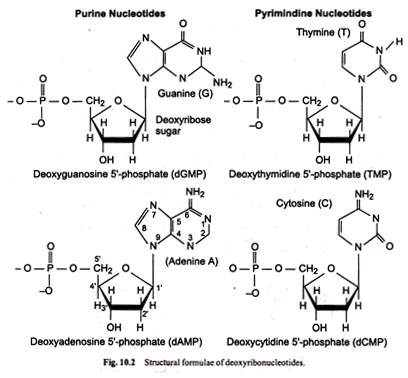
The tissue to be stained must be hydrolysed to enable it to undergo the stain reaction. During hydrolysis the purine bases are liberated from the deoxyribose components, liberating aldehyde groups on the sugar moiety. This insoluble product (apurinic acid) reacts with the Schiff’s reagent (Schiff’s aldehyde reaction) to stain the chromosomes bright magenta.
Of all the chromosomal stains used, the exact chemical mechanism of reaction is understood only in case of this stain. Feulgen stain is both a qualitative and a quantitative stain for DNA. By spectrophotometry analysis, after proper standardization of staining, the amount of DNA present in the chromosomes can be determined.
Procedure:
Take fresh, healthy, young root tips from the plant and wash in running water to remove the dirt. Cut out the tips (about 0.5 cm) and pre-treat suitably. Fix in acetic: alcohol (1: 1) for 45 mins. to 1 hour. Hydrolyze in normal HCl for 10-12 mins. at 60°C in a water bath or a hot air oven. Rinse the root tips in distilled water.
Stain in leuco basic fuchsin solution for 30 mins. or above, till the tips become bright magenta in colour. Transfer a root tip to a clean grease free slide, cut out the coloured tip portion and squash in 45% acetic acid. Seal with paraffin and observe. For flower buds follow the dry smear technique (described) later.
Precaution:
The most critical step in Feulgen stain is hydrolysis. Without proper hydrolysis, staining does not take place. For proper hydrolysis proceed as follows: Heat some water in a water bath. Take a little normal HCl in a specimen tube and immerse it partially in the water-bath, supporting it by two needles pricked into the cork of the tube.
Allow the temperature of the water-bath to come up to 60°C. Wait for 10 mins. for the HCl to reach the same temperature. Now transfer the root tips into the tube and hydrolyse for 10 mins.
Maintain the temperature of the water-bath at 60° ± 2°C by adding cold water or by removing the burner. When hydrolysis is complete pour the contents of the tube immediately in a beaker or petridish containing a sufficient amount of distilled water.
Technique # 6. Study of Meiosis following Dry Smear Technique and Crystal Violet Staining:
Take out an anther from a flower bud. Observe whether it is in the dividing stage following the Aceto-carmine technique.
When a suitable bud is found, take the remaining anthers on a clean and grease-free slide (not more than 2-3 anthers) and smear them on the dry slide with a clean scalpel and immediately invert the slide in a petridish having a glass rod and containing a mixture of Nawaschin’s fixative A and B (1 : 1). Keep for overnight. Wash in running water for 3 hours.
For washing, place the slides in a beaker or trough. Put it under the tap and open the tap just a little. This washing removes all the excess fixative from the tissues. If necessary, the fixation period can be reduced to 1 or 2 hours and the washing time to 30 min. or 1 hour.
Stain in 1% aq. crystal violet solution for 30 min. Rinse in distilled water, Mordant in potassium iodide and iodine solution for 45 sec. Pass through absolute ethyl alcohol I, II and III giving 2 to 3 dips in each. While passing from one alcohol jar to another, jerk the slide on blotting paper a little to minimize the mixing of alcohol.
After dehydration, keep the slide in clove oil I for 2-5 mins. and observe the slide under the low power microscope to see whether the staining is correct. For observation, wipe the back of the slide with blotting paper and place it on another dry slide.
Differentiate in clove oil II for 5-15 mins. Keep in xylol I, II and III — 1 hour in each. If necessary the slides can be kept in xylol III overnight and the time period in xylol I and II slightly reduced. Mount in Canada balsam and dry on a hot plate.
N.B.:
The reagents are kept in staining jars (coplin jars) in proper sequence. Iodine mordant is prepared by dissolving 1 gm. potassium iodide and 1 gm. iodine crystals in 100 ml 80% alcohol. Dehydration in abs. alcohol should be done very quickly, otherwise all the stain will be washed out. It is to be noted that no graded series of alcohol is used here; because that would cause the stain to disappear completely.
Differentiation in clove oil must be done under microscope to ensure proper staining. If the clove oil is fresh, the period of treatment in it should be less and the time should be progressively increased, as it changes colour due to repeated use.
Technique # 7. Schedule for Aceto-Orcein Squash of Leaf-Tip:
Karyotype study can also be made from leaf-tip i.e., Shoot apex. Cestrum, Cycas and Hydrilla are ideal materials for classwork. The schedule of treatment is similar to root tips. The above-named materials can be pretreated in Para dichlorobenzene for 3-4 hours.
Fixation is done in acetic: alcohol (1: 2 or 1: 3) for 1 hour to overnight. As shoot cells are richer in ergastic matters, high proportion of alcohol is preferred in fixative which helps to dissolve some of the ergastic matters. Prolonged fixation is also recommended for the same reason.
The exact tip of the shoot along with some very young leaf primordia are dissected out for squashing. It is convenient to cut it out into 2 or more segments and squash them on different slides. As the rate of growth of the shoot tip is slower than that of the root tip, fewer dividing cells are observed in the slides.
Technique # 8. Schedule for Demonstration of Spiral Nature of Chromosomes:
Within the chromosomes the chromonemata remains spirally coiled. This is not visible in metaphase chromosomes as they remain en-sheathed by an outer core of nucleic acid or matrix. If the tissue is treated with some strong acid fume then this matrix becomes partially dissolved revealing the spiral nature of chromosomes.
The spiral nature of chromosomes can be demonstrated in bulbs of onion or garlic with fresh healthy roots. Take the bulbs with roots attached to them and wash thoroughly under running water to remove all dirt. Place the bulbs with roots intact near the mouth of a bottle or jar containing fuming (conc.) nitric acid, hydrochloric acid and acetic acid for 1-2 minutes in such a way that the roots are fully exposed to acid fumes.
Cut out the root tips and fix them in acetic: alcohol (1: 1) for 1 hour. Squash the root tips following the usual Aceto-orcein schedule, seal with paraffin and observe the spiral nature of chromosomes under microscope.
Technique # 9. Schedule for Demonstration of Orcein Breakage of Chromosomes:
Mitotic chromosomes are stained by gentle heating in orcein-HCl mixture. But prolonged heating in orcein causes chromosome breakage. The frequency of breakage depends upon the period of heating. Take actively growing and healthy root tips of onion, garlic or any plant, preferably with long chromosomes. The roots may or may not be pre-treated.
Onion or garlic root tips may be pre-treated in 0.002M solution of 8-oxy-quino-line for 2 hours at 6- 18°C. Fix the root tips in acetic: alcohol (1: 1) for 45 mins. to 1 hour. Heat the root tips over a flame in a mixture of 2% Aceto-orcein and N. HCl (9: 1) in different tubes for 30 sees, 1 min and 23 mins. After 15- 20 mins.squash the root tips in 1% Aceto-orcein and observe.
Note that there are more fragments in the root-tips heated for 1 min than those heated for 30 sees, and, in the root-tips heated for 2 mins., there are innumerable dot-like fragments. The frequency of fragmentation can be calculated by making several observations and finding out the mean.
Technique # 10. Schedule for Pollen Tube Staining:
After pollination pollen grains germinate on the stigma and grow through the style to reach the eggs which lie within the ovules. A pollen tube contains a vegetative nucleus (tube nucleus) which lies at the tip of the pollen tube and a generative nucleus which divides to form the two male gametes.
Dust some mature pollen grains on a cover glass and invert it over a grooved slide or a rimmed slide containing 3% sugar solution with a trace of 0.05% colchicine solution. A trace of boric acid often helps in pollen germination. Smear border of the cover glass with Vaseline to make it air-tight. Keep the slide at a temperature of 20-25°C.
Examine periodically under microscope to see whether pollen tubes have come out. Transfer some pollen tubes onto a slide with the help of a brush. Stain with a drop of 1 % Aceto-orcein solution, blot off the excess stain with blotting paper, seal with paraffin and observe. The vegetative nucleus will be seen at the tip of the pollen tube. The generative nucleus or the two male gametes lie a little behind it.
Technique # 11. Schedule for the Study of Pollen Mitosis:
The pollen grain undergoes two mitotic divisions. The first one occurs a little after the completion of tetrad formation and forms the vegetative nucleus and the generative nucleus. The generative nucleus usually divides again in the pollen tube to form the two male gametes.
These two divisions are of interest as they represent haploid mitosis, i.e. mitosis in haploid cells. The first pollen mitosis can be worked out easily from flower buds of Allium cepa, Rhoeospathecea (R. discolor) etc. Take buds which are just a little bigger than those showing the tetrad stage. Use 1% Aceto-carmine soln. as stain. The procedure is the same as followed to work out meiotic stages.
Technique # 12. Schedule for Demonstration of Banding Pattern with Orcein Staining:
Take actively growing and healthy root tips of a plant. Pre-treat and then fix them suitably (refer to Schedules II and III). Hydrolyse in normal hydrochloric acid at 60°C for 20-25 sees. Squash in 45% acetic acid. Invert the slide with the cover glass in absolute ethanol and keep till the cover glass gets detached.
Treat both the slide and the cover glass (if it also contains some tissue) in a saturated aqueous solution of barium hydroxide for 5 mins. at room temperature. Wash in distilled water thoroughly. Incubate in 2 × SSC for 25 mins. to 1 hour at 60°C. Wash again in distilled water.
Dry the slide and also the cover glass in front of a current of warm air. Stain in 1% Aceto-orcein solution for some mins. (depends upon the material) and mount with a fresh cover glass or slide, as the case may be. Seal with paraffin and observe. The metaphase chromosomes are found to be well-scattered and they show distinct transverse banding patterns.
Technique # 13. Schedule for Determination of Percentage of Pollen Sterility:
Dust some pollen grains from a mature anther on a slide. Put a drop of 1 % Aceto-carmine, cover with a cover glass, blot off the excess stain, seal with paraffin and observe.
Fertile grains are larger in size with deeply stained cytoplasm. Sterile grains are smaller in size, shrunken and hyaline as they have no cytoplasm. Count their numbers in the field of observation. Take a number of readings and calculate the percentage of pollen sterility.
Technique # 14. Schedule for Karyotype Analysis:
Take actively growing and healthy root tips of Allium cepa (onion). Pre-treat and then fix them suitably (refer to Schedules II and III). Then stain the root-tip in Aceto-orcein (N) HCl mixture (9:1) (refer to Schedule II) and squash the treated and stained root tip to study the chromosomal Karyotype.
Careful observations were made for demarcation of cach chromosome type with length of arms. The F% and other features of the chromosomes are demarcated as per Schedule no. I. The details are given in Table 2.1.

From the above it appears that the Karyotype shows 16 chromosomes in all of which one pair is metacentric (A), 7 pair nearly metacentric (B) and the rest sub-metacentric (C) type (Fig. 2.5).

Technique # 15. Schedule for Determination of Chiasma Frequency:
Take anthers from suitable flower buds and then smear on a clean glass slide using a drop of 1% Aceto-carmine solution. Blot the excess stain after covering cover glass. The chiasma frequency was recorded by observing the meiotic prophase stage I (Diplotene and diakinesis stage), in the dividing cells and the frequency was expressed as no./cell by using the formulae:
Chiasma frequency (no./cell) = No. of chiasma in all the cells/Total no. of cells
The detailed observations were recorded as per Table 2.2.
Thus the chiasma frequency (no./cell) = No. of chiasma in all the cells concerned/Total no. of cells =133/20 = 6.66
Technique # 16. Schedule for Pyronin Methyl Green Staining:
This is a specialized staining for localization of DNA and RNA on nucleus vis-a-vis on chromatin. Take an anther from suitable flower bud and then smear on a clean dry grease-free slide. Then fix in 80% chilled alcohol for 4 hours.
Slides then brought to water grade through downgrade fixation process and finally immerse in the dye mixture (2% aqueous pyronin 50 ml, 2% aqueous methyl green 50 ml, distilled water 10 ml and chloroform 10 ml mixture) for 15 mins at 20°C.
Blot the superficial stain by blotting paper and dip the slide in mixture (1: 1) of ethyl alcohol (50%) and N-Butyl alcohol for 2 seconds and finally rinse in N Butyl alcohol for 10 mins. Wash again in distilled water, teuol for 1 hour and mount by using Eupersol for microscopic observation. On observation, chromosome or chromatin showed bright green coloration, while cytoplasm and nucleoplasm showed pink colouration.
Technique # 17. Schedule for In Situ localization of Alkaline Phosphatase Activity:
Take anther from suitable size flower buds and smear on dry, clean, grease-free slides and fix in chilled 80% alcohol for 1 hour. The slide is then brought down to water stage through downgrade fixation in ethanol and finally incubate at 37°C in incubation mixture for 4 hours to overnight.
The incubation mixture is composed of 10 ml of 3% sodium glycerophosphate, 2% sodium barbital and 2% calcium chloride each and 5 ml of distilled water, 1 ml and 5% Magnesium sulphate and a few drops of chloroform. The slides are rinsed in distilled water and then kept in 2% cobalt chloride solution for 5 mins.
Once again the slides are washed and kept in freshly prepared yellow ammonium sulphide solution (50 drops of syrupy ammonium sulphide and 20 ml distilled water) for 1-2 mins.
Then the slides are washed in distilled water and dehydrated through upgrade path and finally mounted by using euperol. The chromosomes appear black due to the formation of black ppt of cobalt sulphide on chromosomes. The precipitated sites are indicative of alkaline phosphatase activity site.
Technique # 18. Schedule for Study of Mitotic Index:
Mitotic index (MI) is the percentage of dividing cells in the total number of cells present.
So the formulae is:
Mitotic index (MI) = Number of dividing cells/Total no. of cells × 100
Take freshly collected healthy root tips of Allium cepa for mitotic chromosomal preparation as described in earlier Schedule II. The observation is then tabulated in Table 2.3.
Technique # 19. Schedule for Study of the Effect of Chemicals on Chromosomes: Allium Test:
Take healthy and freshly grown rooting bulbs of Allium cepa. The bulbs are then dipped in ¼th saturated solution of Gammaxane for 3 hours. Then selected root tips are removed for fixation (Acetic alcohol 1 : 3) for overnight.
Examine the squash preparations for studying the chromosomal abnormalities in dividing cells. Observe the chromosomal abnormalities in dividing cells, viz., metaphase asset clumping, fragmentation, diplochromatid formation, sticky, bridge card laggered chromosome etc.
A model example of observation is given in Table 2.4. 
Different concentrations or different time durations of chemical treatment may be used by the study of effect separately.
Technique # 20. Schedule for the Study of Effect of Ionizing Radiation on Chromosomes:
Take healthy sooted bulbs of Allium cepa and then treat with irrigation from cobalt 60 emitting Y rays (3K) for 1 hour. Root tips excised after treatment and squash preparations were made separately by following the orceinsquarch technique (Schedule II). Observe the chromosomal abnormalities and record the date. The details are given in Table 2.5.

Technique # 21. Schedule for Nucleolar Staining in Plant Cells:
Principle:
The main constituent of nucleolus is protein which account for 90% of the nucleolar dry mass. It is also very rich in RNA comprising of nearly 2 to 17% of dry weight. Most of the nuclear staining methods are based on the principle of staining of the acidic protein which comprises the major mass of nuclear proteins due to prevalence of aspartic acid and glutamic acid residues.
There are two principle staining methods:
(A) Silver staining method, and
(B) Aqueous Haematoxylin method.
The details of the staining methods are described separately.
(A) Silver Staining Method:
This method was proposed by Howell and Black (1980) and is applicable to stain the nucleous in cells of dry squash preparation.
The process involves two steps:
(a) Dry squash preparation, and
(b) Staining process.
Requirements:
1. Saturated aesculine solution
2. Acetic-alcohol fixative (1 : 1)
3. Acetic acid (45%)
4. HCl (1 N)
5. Colloidal developer:
2 gm. powder gelatin mixed in 100 ml boiling distilled water, and then 1 ml formic acid is added. Then boiled for 10 min.
6. Aqueous Silver nitrate solution (50%).
7. Fresh root tips
8. Slides and cover glass etc.
Step I:
Procedure:
The root tips following conventional pre-treatment and fixation steps are hydrolysed in 1 NHCl at 60°C for 1-2 minutes, then washed in water and squashed in 45% acetic acid. The cover glass is detached by dipping the slide in absolute alcohol for desired period. The slide and cover-glass containing the squash is air-dried overnight and kept in slide box preserved in desiccator at 4°C.
In an alternative method, the tip-portion is squashed dry without using acetic acid and the cover-glass is detached by subjecting the preparation to chilled treatment (-70°C) in freezer for 5 minutes and then air-dried and finally preserved in desiccator.
Step II:
Procedure:
Two drops of colloidal developer and 4 drops of aqueous AgN03 solution are pipetted into the slide containing dry squash. The solutions are mixed and covered with cover glass and, finally, placed inside an incubator stabilized at 70°C. Within a minute, the staining mixture turns yellow and, subsequently, golden brown.
Then the slide is taken out, cover glass is raised and, finally, cover glass is rinsed off in desiccated water and slide is air-dried overnight and observation mount in DPX. The nucleoli appear as dark-brown bodies, and the outline of nucleus appear as light golden-brown bodies. The silver nitrate gets reduced by carboxyl group of several acidic proteins associated with nucleolus giving rise to dark-brown stain.
(B) Aqueous Haematoxylin Method:
This is a much easier and less expensive method. It is standardized in different plant groups by Dey and Ghosh (1987). This technique is applied in intact root or other organs but not applicable in dry squash preparation.
Requirement:
1. Lillie’s Fixative: Acetic acid-Alcohol and formalin solution (45 formalin, acetic acid and absolute alcohol ratio 1: 2: 17).
2. Acetic acid (45%)
3. Iron alum (saturated solution)
4. Aqueous Haematoxylin solution (0.5%)
5. Slides & Cover glass
6. Freshly collected root tips etc.
Procedure:
The root tips are fixed in Lillie’s AAF solution in cold overnight. It is then hydrolysed in 45% acetic acid at 85°C for 30 minutes.
Then the tips were washed thoroughly in water and treated in freshly prepared saturated aqueous solution of Iron alum for 5-6 minutes at room temperature. It is then stained in 0.5% Aqueous Haematoxylin solution for 30 minutes and squashed in 45% acetic acid. Then examine the slide under microscope.
For prolong preservation, such temporary preparation can be made permanent by conventional schedule. The period of hydrolysis and treatment with iron alum varies according to the materials used and should be standardized.