The below mentioned article includes a collection of thirteen experiments on transpiration.
1. Experiment to demonstrate the transpiration phenomenon with the bell jar method:
Requirements:
Bell jar, well-watered potted plant, rubber sheet, glass plate, Vaseline.
Method:
1. Take a well-watered, healthy potted plant and cover the pot with the help of rubber sheet. Only aerial parts of the plant should remain uncovered.
2. Keep the potted plant on a glass plate and cover it with a bell jar (Fig. 21).
3. Apply vaseline at the base of the bell jar to prevent the outer air to pass in the bell jar.
4. Keep the whole apparatus in light and observe for some time.
5. Set another experiment exactly in the same way except that the pot should be without any plant.
Observations:
Water drops appear inside the wall of the bell jar containing a potted plant while there is no drop in the another bell jar which is without any plant.
Results:
Because water drops appear only in the bell jar in which pot is having a plant with its only aerial parts exposed, so it can be concluded that these drops appeared due to the process of transpiration from the aerial parts of the plant. The same can also be concluded by the observations of the control apparatus, in which no water drop appears due to the absence of plant in the pot.
2. Experiment to demonstration of Transpiration by Cobalt-Chloride Screen:
Requirements:
Filter paper, cobalt-chloride solution, a potted plant, clip.
Experiment:
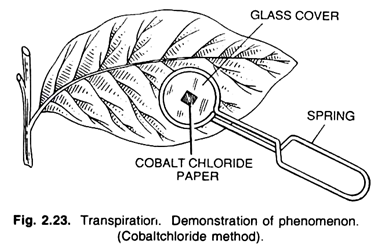
Some pieces of the filter paper are dipped in cobalt chloride solution and then dried off. They are blue coloured. Now, two such pieces of filter paper are taken and pressed on both the surfaces of the leaf of a potted plant with the help of a clip. This apparatus is kept for some time as such.
Observation:
After a few hours, when it is observed, the cobalt chloride paper of the lower surface of the leaf becomes pink coloured.
Explanation:
The dried blue coloured cobalt chloride paper turns red as it becomes moist. The stomata are confined mostly on the lower surface of the leaf, and therefore, the cobalt chloride paper of that surface becomes moist and turns red. The paper of the upper side of the leaf may also become pink to some extent, as few stomata are found on this side.
3. Experiment to demonstration of Transpiration by Four-Leaf Experiment:
Requirements:
Four leaves, Vaseline and a string.
Experiment:
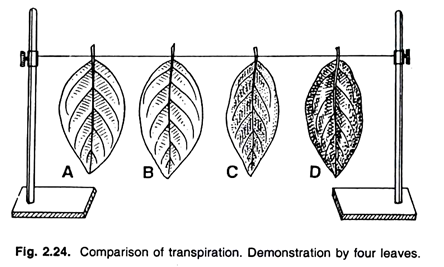
To demonstrate the transpiration from the leaf surface, four banyan leaves are taken. Both the surfaces of the A leaf, lower surface (with stomata) of B leaf, upper surface (without stomata) of C leaf are vaselined. The Vaseline is not applied on the D leaf. Now, as shown in the figure the leaves are hanged so that they may transpire freely.
Observation and Explanation:
When the observations are taken after a day or two, they are as follows — the A leaf, which is vaselined on its both the surfaces, looks fresh and green, as no surface transpires. The B leaf is vaselined on its lower surface (with stomata), and transpiration takes place only from the upper surface which is negligible. This leaf also remains turgid and green like the A leaf.
If few stomata are present on the upper surface of the leaf, then it shrivels to some extent. The C leaf is vaselined on its upper surface, which contains less number of stomata or no stomata. The transpiration takes place from the lower stomatal surface, and the leaf shrivels to a large extent.
The D leaf is not vaselined and both the surfaces transpire freely releasing much water. The leaf wilts completely in this case. This experiment proves that the rate of stomatal transpiration is fairly higher than the cuticular transpiration.
4. Experiment to Compare the rate of transpiration from both the surfaces of leaf by Garreau’s Potometer:
Requirements:
Garreau’s potometer, stand, leaf, etc.
Method:
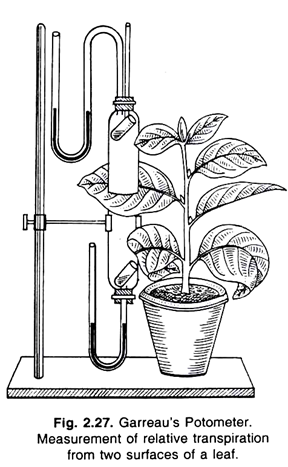
With the help of this apparatus, the comparative study of the transpiration from both the surfaces of the leaf is being done. This apparatus consists of two small bell-jars, which are kept together in close contact as shown in the figure.
A leaf of a potted plant is kept in between these two bell-jars. In each of these bell-jars a small test tube is kept. Each small test tube contains equal amount of anhydrous calcium chloride (CaCl2).
The apparatus is made air-tight, applying vaseline where they press the leaf in between. There are two manometers at the two ends of the bell-jars. They are partially filled with oil.
These manometers, however, maintain the vapour of the bell-jars. If the surface of the oil, within the manometers changes, then it indicates that the apparatus is not airtight or the vapour released from the leaf surface is not completely absorbed by calcium chloride.
The complete apparatus is fitted upon a vertical stand. After few hours, the calcium chloride tubes are taken out and weighed again. This way, the water transpired from both the surfaces of the leaf may be known.
Observation and Explanation:
The amount of water transpired from the lower surface (stomatal surface) of the leaf is always greater, as it bears large number of stomata. The cuticular transpiration takes place from the upper surface of the leaf, which is very much less.
5. Experiment to measure the rate of transpiration by using simple potometer or Darwin’s potometer:
Requirements:
Simple potometer, beaker, scale, water, cork, a freshly cut twig, grease, stop watch.
Simple Potometer:
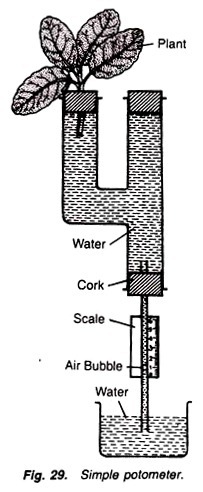
It is made up of glass tube having a side limb. The mouth of the side tube is fitted with a cork having a hole, through which the twig is inserted in the tube. Upper end of the straight tube is closed by a cork and in its lower end a cork with a capillary tube is fitted. Lower part of the capillary tube is placed in beaker containing water. A scale is fitted on the capillary tube (Fig. 29).
Method:
1. Fill the potometer with water and insert a freshly cut twig in the hole of side limb in such a way that its lower end is in the water. Cut the twig in the water.
2. Make all the joints air-tight by applying grease.
3. Insert a bubble in the capillary tube and place the whole apparatus in light.
4. Note the readings in shade, wind and also in darkness.
Results:
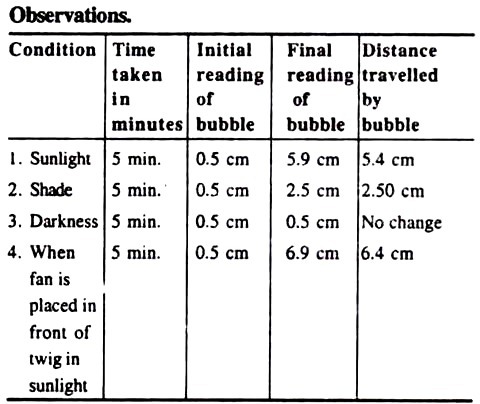
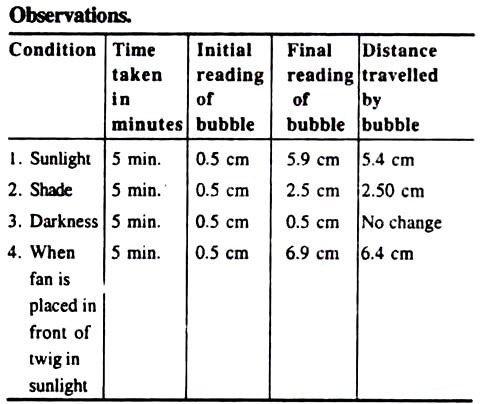
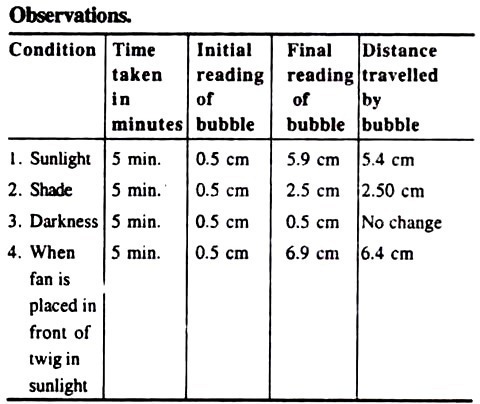
The observations of above table indicate that the largest distance is travelled by the bubble in a given time when the apparatus is placed in front of a fan in sunlight and the distance travelled is least in the shade. There is no change in the position of bubble when the apparatus is placed in darkens.
Changes in all these conditions can be explained as follows:
1. In sunlight:
When the apparatus is placed in sunlight, the stomata will open and the temperature will also be high. So the atmospheric humidity will be less. All these conditions favour the transpiration and so more water will be transpired, and nearly equal amount will be absorbed from the potometer. This can be observed by the movement of bubble in the capillary tube.
2. In shade:
The atmospheric humidity is high in the shady conditions and so the atmosphere outside the apparatus is saturated with water vapours. In the high atmospheric humidity the temperature will also not be too high. All these conditions are unfavourable for the transpiration, and hence it will be too less.
3. In darkness:
Stomata do not open in darkness. So, when the stomata, the chief apparatuses for transpiration, remain close, question does not arise of transpiration and hence there will be no change in the position of the inserted bubble.
4. When the apparatus is placed in front of fan in the sunlight:
Sunlight is in itself sufficient for high transpiration because it increases the temperature, lowers the atmospheric humidity and opens the stomata, being all these conditions favourable for the process.
If a fan is also placed in front of apparatus if will provide a continuous current of wind which also removes the water vapours and reduces the atmospheric humidity, and thus ultimately favouring more for the process of transpiration. Thus, the transpiration process will be very high in these conditions.
6. Experiment to measure the rate of transpiration by using Farmer’s Potometer:
Requirements:
Farmer’s proto-meter, beaker, water, cork, fresh twig cut in water, grease, stop watch.
Farmer’s photometer:
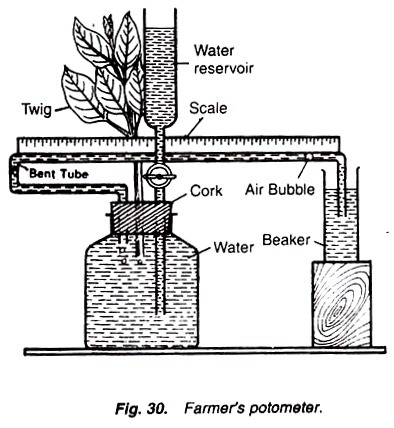
It consists of a wide-mouthed bottle fitted with a rubber cork having 3 holes. In one hole is fitted a thistle funnel provided with a stop cork; through the second hole is inserted a leafy twig; and in the third hole is fitted a bent tube of narrow bore provided with a scale. The other end of the bent tube is placed in a beaker containing water (Fig. 30).
Method:
1. Fill the whole apparatus with water and insert a freshly cut twig through one of the holes.
2. Make all the joints air-tight by applying grease, thoroughly.
3. Insert one air bubble in the graduated tube, place it again in the beaker containing water and keep the whole apparatus in light.
4. Note the initial and final readings of the bubble in a given time.
5. Note the same readings in the same time in shade, darkness and by placing a fan in front of apparatus.
Observations:
Results:
The observations of above table indicate that the largest distance is travelled by the bubble in a given time when the apparatus is placed in front of a fan in sunlight and the distance travelled is least in the shade. There is no change in the position of bubble when the apparatus is placed in darkens.
7. Experiment to measure the rate of transpiration by using Ganong’s potometer:
Requirements:
Ganong’s potometer, twig, water, beaker, grease, stop watch.
Ganong’s potometer:
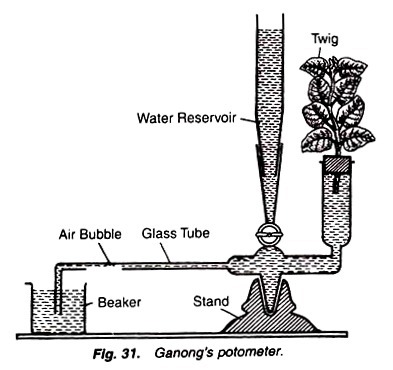
It consists of a graduated tube dipped into the beaker containing water. The graduated tube is connected with a vertical arm bearing a cork on its mouth. The cork contains one hole through which a twig is inserted in the water of the vertical arm. Vertical arm is also attached with a stop cork connected with a water reservoir (Fig. 31).
Method:
1. Fill the apparatus with water through the water reservoir.
2. Insert a freshly cut twig in the water of the vertical arm through the hole of the cork.
3. Make all the joints air-tight by applying grease.
4. Insert an air bubble in the graduated tube and keep the whole apparatus in sunlight.
5. Note the initial and final readings of the bubble in given time in different conditions like sunlight, shade, darkness and by placing the plant in front of a fan in sunlight.
Observations:
Results:
The observations of above table indicate that the largest distance is travelled by the bubble in a given time when the apparatus is placed in front of a fan in sunlight and the distance travelled is least in the shade. There is no change in the position of bubble when the apparatus is placed in darkens.
8. Experiment to measure the rate of transpiration by using Bose’s potometer:
Requirements:
Bose’s potometer freshly cut twig (in water), water, beaker, grease, stop watch, oil.
Bose’s Potometer:
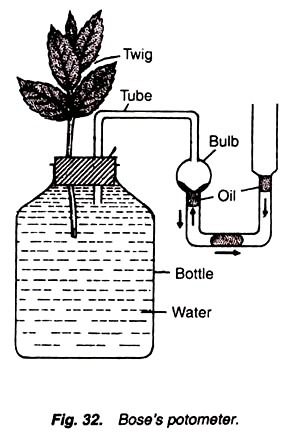
It consists of a wide-mouthed bottle, the mouth of which is fitted with a two-holed cork. The bottle is filled with water. A freshly cut twig is inserted in one of the hole. Through the another hole is fitted a bent tube having two bulbs. A small oil drop is introduced in the outer bulb of the bent tube (Fig. 32).
Method:
1. Fill the bottle with the water and insert the freshly cut twig in one of its hole.
2. Make the apparatus air-tight by applying grease on the joints.
3. Put a drop of the non-volatile oil in the outer bulb and keep the whole apparatus in light.
Observations:
The twig is transpiring the water vapours from its leaves and it is also absorbing water from the bottle, thus creating a vacuum. Due to this, the oil drop is pushed towards the inner bulb through the horizontal arm. As soon as it reaches the inner bulb, it bursts and again moves back into the horizontal tube. This movement is again repeated into the inner bulb from the horizontal tube.
Note the time taken for two consecutive bursts with the help of stop watch.
Note the same readings in different conditions, i.e., shade, darkness and by placing the plant in front of fan in sunlight.
Results:
Transpiration is highest when the plant is placed in sunlight in front of fan and it is lowest or absent in darkness.
9. Experiment to demonstrate the water-lifting power of transpiration process:
Requirements:
Beaker, water, mercury, stand, capillary tube, vaseline, cork, plant twig, oil cloth.
Method:
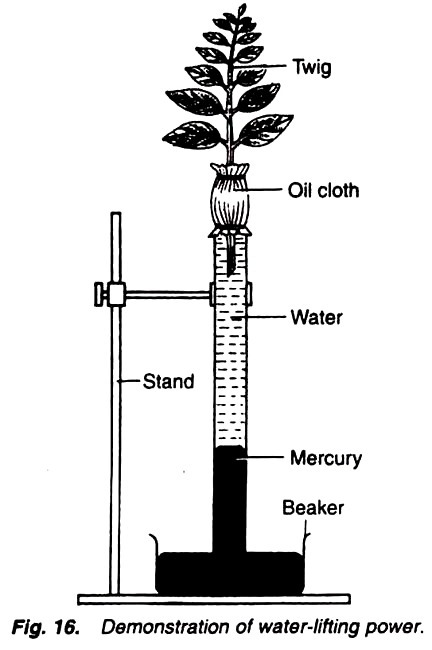
1. Take some amount of mercury in the beaker and invert a wide-mouthed capillary tube over it.
2. Fill the capillary tube with water.
3. Insert the plant twig into the hole of the cork in such a way so that its cut end is dipped in the water.
4. Apply the vaseline on the cork and hole to make it air-tight (To make the cork region air-tight oil cloth may also be used instead of vaseline).
5. Keep the whole apparatus in sun.
6. Note the mercury level in the capillary tube and wait for some time.
Observations:
Mercury level rises in the capillary tube (Fig. 16).
Results:
Mercury level rises in the capillary tube because of the pull or suction exerted by the transpiration process. Aerial parts of the plants are continuously evaporating water because of transpiration process. To compensate this loss the water is absorbed by the plant and lifted. So, the space in the capillary tube, which was first occupied by this absorbed water, is now occupied by the mercury. This demonstrates the water-lifting power of the transpiration process.
10. Experiment to demonstrate the suction and to measure suction force due to transpiration:
Requirements:
h-shaped three-limbed tube, capillary tube, beaker, stand, cork, mercury and a small entire plant with roots, stem and leaves.
Method:
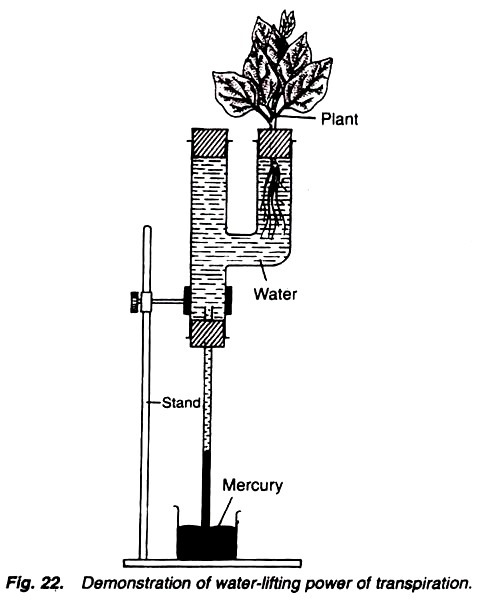
1. Take a h-shaped three-limbed tube and fix it with a stand with the two limbs of the tube up as shown in Fig. 22.
2. Now in the lower limb of tube fit a cork fitted with a capillary tube.
3. Take some mercury in the beaker and keep in it the lower end of the capillary tube.
4. Fill the tube completely with water.
5. Fit a cork tightly in the straight end of the tube. Fit a cork, fitted with an entire small plant, in the another arm of the tube (Fig. 22).
6. Make the apparatus air tight, keep it in the sunlight and observe continuously for some time.
Observation:
Mercury level in the capillary tube rises.
Results:
The rise in the mercury level is due to the fact that water is continuously evaporating from the aerial parts of the plant under the process of transpiration and on the other hand this loss of water is compensated by water absorbed by the roots. Because the roots are absorbing the water from the tube so the space in the capillary tube which was occupied previously by absorbed water is now occupied by the mercury due to the suction force.
This suction force can be estimated by the following formula:
Suction or pulling force = πr2h x 13.6 gms
π = 22/7
r = radius of capillary tube
h = rise of mercury level
13.6= is the relative density of mercury.
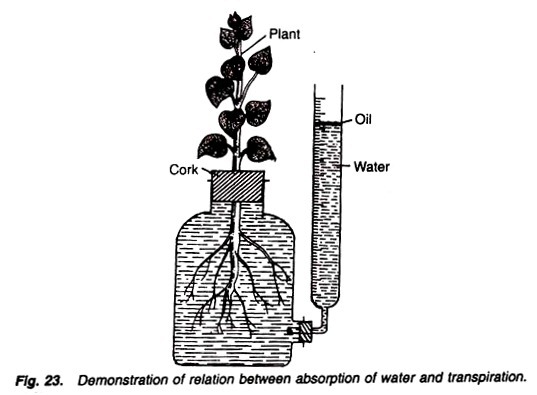
11. Experiment to compare the rate of absorption with the rate of transpiration:
Requirements:
A wide-mouthed bottle with a graduated side tube, cork, oil, a small rooted plant, water, physical balance, weighing box.
Method:
1. Take a wide-mouthed bottle fitted with a graduated side tube.
2. Fill the apparatus with water.
3. Just above the water level, in the side tube, put a few drops of oil. It checks the evaporation of water.
4. In the mouth of the bottle fit a cork having a hole. Fix air-tightly a well developed rooted plant in the hole of cork in such a way that its roots remain in the water (Fig. 23).
5. Mark the initial water level in the graduated side tube and weigh the whole apparatus.
6. Keep the apparatus in light for some time, note the final level of water in the graduated tube and again weigh the whole apparatus.
Observations:
The final weight of the apparatus decreases and there is also a decrease in the water level in the graduated side tube.
Results:
The difference between the initial and the final weight is equal to the amount of water evaporated under the process of transpiration. The difference in the initial and final water level in the graduated side tube is equal to the water absorbed by the plant.
The difference in the weight of apparatus is nearly equal to the difference in the water level in the graduated side tube, and this indicates the fact that water transpired by the plant is approximately equal to the water absorbed by the plant.
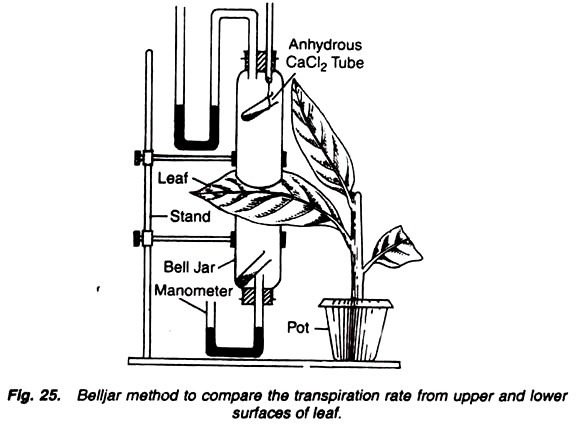
12. Experiment to compare the transpiration rate of lower and upper surfaces of leaf by bell jar method:
Requirements:
Narrow bell jars (2), small tubes (2), anhydrous calcium chloride, stand, potted plant, U- tube, glycerine, mercury.
Method:
1. Take two narrow bell jars and fix them on the two sides of a dorsiventral leaf of a potted plant.
2. Connect the bell jars with a clamp stand.
3. Keep a pre-weighed small tube containing anhydrous calcium chloride in each bell jar.
4. Connect one U-tube containing mercury or glycerine at the two ends of bell jars (Fig. 25).
5. Apply vaseline on the contacts between bell jars and the leaf to make the apparatus air-tight.
6. Keep the apparatus as such for a few hours. Remove both the calcium chloride-containing small tubes and weigh them again immediately.
7. Same experiment can be repeated with the other leaves of the same plant as well as the leaves of different plants, to be compared for rate of transpiration from upper and lower surfaces of leaves.
Observations:
The weight of both the tubes increases. If a comparison is made then it is observed that weight of the lower tube increases more than the weight of the upper tube.
Results:
The weight of both the tubes increases because the water vapours are transpired from both the surfaces of the leaf and the same transpired water is absorbed by the anhydrous calcium chloride of the tubes, and hence shows an increase in their weight.
More increase in weight of the tube placed in the lower bell jar than that of the upper bell jar indicates that more water is transpired from the lower surface than the upper surface of the leaf. Side by side it also indicates that in the same area of leaf, more number of stomata are present on the lower surface than that of the upper surface.
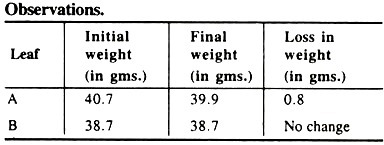
13. Experiment to demonstrate that there is a loss in the total weight of plant due to transpiration:
Requirements:
1. Spring balance (2), two leaves of almost equal size, test tube (2), water, vaseline and stand.
Method:
1. Take two test tubes filled with water and close their mouth with a cork having a hole.
2. Insert the petiole of both the leaves, one in each test tube, and note that it is dipped in water.
3. Apply vaseline on both the surfaces of leaf ‘B’.
4. Connect both the spring balances with the stand and hang both the tubes on the hook of spring balances (Fig. 27).
5. Make both the corks air-tight by applying vaseline.
6. Note the weight of both the tubes.
7. Put the whole apparatus in light and wait for a few hours. Note the weight of both the tubes again.
It is observed that there is a clear loss in weight of test tube having leaf ‘A’ and there is no change in weight in leaf ‘B’.
Results:
Loss in the weight of leaf ‘A’ indicates that this is due to the process of transpiration because the leaf is continuously transpiring the water vapours. But on both the surfaces of leaf ‘B’ vaseline has been applied and so the leaf is not transpiring and so there is no change in its weight. These results clearly indicate that during the transpiration there is a loss in the total weight of the plant.

