Are you researching on experiments on Plants ? You are in the right place. The below mentioned article includes a collection of ten experiments on plants: 1. Plant Pigment Distribution 2. Ascent of Sap in Plants 3. Guttation in Plants 4. Transpiration in Plants 5. Mineral Nutrition in Plants 6. Photosynthesis 7. Respiration in Plants 8. Growth Rate in Plants 9. Growth of Plants by Promoting Substances 10. Biotechnology.
Contents:
- Experiments on Plant Pigment Distribution
- Experiments on Ascent of Sap in Plants
- Experiments on Guttation in Plants
- Experiments on Transpiration in Plants
- Experiments on Mineral Nutrition in Plants
- Experiments on Photosynthesis
- Experiments on Respiration in Plants
- Experiments on Growth Rate in Plants
- Experiments on Growth of Plants by Promoting Substances
- Experiments on Biotechnology
1. Experiments on Plant Pigment Distribution:
Aim of the Experiment:
To detect the presence of anthoxanthin in plant tissues.
Requirements:
White-coloured flowers of any plant, concentrated ammonia, water bath, alcohol, alkali, HCl, basic lead acetate, ferric chloride.
Method:
1. White flowers or petals of white flowers of the given plant (e.g., Phlox or Chrysanthemum) are placed in contact with a few drops of concentrated ammonia. A yellow colour is obtained.
2. Extract white flowers on a water bath with aqueous alcohol.
3. Decant the extract and divide it in three portions:
(i) To one portion add an alkali. The colour changes to yellow. Acidify this by adding a few drops of HCl. The colour disappears.
(ii) To the second portion add basic lead acetate solution. A yellow or orange precipitate is produced.
(iii) To the third portion of the extract add ferric chloride solution. A green or brown colour appears.
All these three tests indicate the presence of anthoxanthins in the material.
2. Experiments on Ascent of Sap in Plants:
Aim of the Experiment:
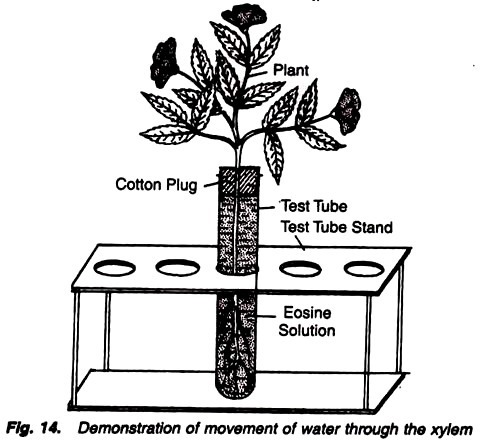
To demonstrate that water moves up through the xylem of the plant.
Requirements:
A Balsam plant, big test tube, test-tube stand, water, cotton, eosin stain, razor, slides, glycerine, microscope, cover-slip.
Method:
1. Take a complete balsam plant with roots, stem, leaves and flowers.
2. Keep the plant in a big test tube containing eosin solution.
3. Fix a cotton plug at the mouth of test tube and keep the experiment undisturbed for 2-3 hours (Fig. 14).
4. Cut the transverse section of stem with a razor, place it on slide and study under the microscope.
Observations:
It is observed that the petiole bases and the petals have become pink coloured. In the transverse section of the stem only xylem has taken the stain.
Results:
Pink stain of the petiole bases and the petals indicates that eosin stain has reached up to petiole bases and flowers through root stem and leaves. Study of the transverse section under the microscope reveals that only xylem cells are stained, thus indicating that the solution moved through the xylem.
3. Experiments on Guttation in Plants:
Aim of the Experiment:
To demonstrate the process of guttation with entire potted plant.
Requirements:
A potted plant of garden nasturtium, water, bell jar (Instead of garden nasturtium other plants like oat seedlings, wheat seedlings, tomato, Colocasia, etc. may also be taken).
Method:
1. Take a potted plant of garden nasturtium and water it copiously.
2. Cover the pot along the plant with a bell jar and place it in a cool and dark place.
3. Connect the apparatus to an aspirator and make it air-tight (Fig. 17).
4. Keep the experiment a for a few hours and observe the changes.
Observations:
Slow exudation of water begins at the tip of each leaf. These water drops gradually enlarge and may fall off or run down the side of the leaf.
Results:
This exudation of water is due to the phenomenon of guttation. When the plant is copiously watered then water is forced from the xylem vessels through intercellular spaces and out of plant from pore-like structures (called hydathodes, water pores or water stomata’s, Fig. 19) present at the margins of the leaves.
Water exudes through hydathodes with the help of a pressure developed in the sap of the xylem elements. It is believed to be a pressure identical with the root pressure. The exuded water also contains amino acids, mineral salts, sugars and traces of other solutes.
Guttation occurs abundantly when the conditions are such that absorption of water by the roots is very high and the rate of transpiration is very slow. Guttation can also be demonstrated with a single freshly cut leaf of garden nasturtium when it is fixed on one end of a U-tube fitted with a cork and filled with water. From the other end of the U-tube add a little amount of mercury which helps in forcing the water in the petiole.
4. Experiments on Transpiration in Plants:
Aim of the Experiment:
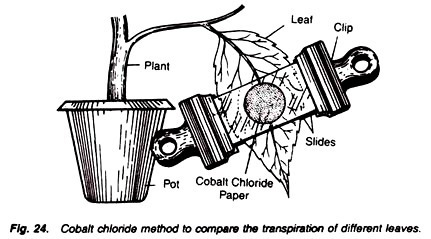
To compare the stomatal and cuticular transpiration of the leaves of different plants by cobalt chloride method.
Requirements:
Leaves of the plants to be compared for transpiration (preferably they should be worked out in the attached condition), 3% solution of cobalt chloride, filter paper, slides, forceps, clips, stop watch, desiccator, anhydrous calcium chloride and vaseline.
Method:
(a) Preparation of cobalt chloride discs:
1. Prepare a 3% solution of cobalt chloride and soak the filter papers in it.
2. Remove the excess of cobalt chloride solution from filter papers by squeezing them with a rubber roller and let them dry.
3. Cut the filter paper into small discs of definite diameter, make them absolutely dry in an oven at 30°-40°C and preserve them in a desiccator. Dry discs are of blue colour.
(b) Comparison of water loss from both the leaf surfaces:
4. Take a leaf of the plant and place one disc of cobalt chloride paper on its upper surface and one on Lower surface. Press them with clean glass slides.
5. Clip the two slides together with two separate clips, make them air-tight with vaseline and start the stop watch (Fig. 24).
6. Note the time in which blue colour of disc changes into pink.
7. Repeat the same experiment with the leaves of the other plants to be compared for the rate of transpiration.
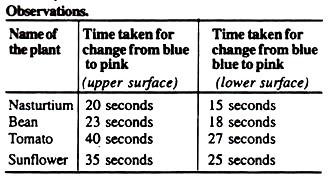
Above-mentioned observations indicate that the time required for a change from blue to pink on lower surface of leaves is less than that of upper surface.
Results:
Because the colour changes rapidly on the lower surface than the upper surface in all the leaves worked out, so it can be concluded that more water was transpired from the lower surface, and hence more stomata are present on this surface than the upper surface.
5. Experiments on Mineral Nutrition in Plants:
Aim of the Experiment:
To demonstrate water culture experiment of showing mineral nutrition in plants.
Requirements:
Seven large glass jars, split cork, seedlings of nearly same size (either of maize, oat, tomato or tobacco), Sach’s nutrient solution (normal solution as well as solutions with calcium deficiency, nitrogen deficiency, potassium deficiency, phosphorus deficiency, iron deficiency and magnesium deficiency), black paper.
(A) Preparation of Normal Sach’s Nutrient Solution:
Following composition makes the normal Sach’s nutrient solution:
KNO3 – 2gm
MgSO4 – 1 gm.
NaCl – 0.5 gm.
CaSO4 – 1 gm.
Ca3(PO4)2 – 1 gm.
FeSO4 – Only traces
Water – 2 litres
(B) Preparation of Sach’s nutrient solution with different deficiencies:
(a) Solution for calcium deficiency:
Instead of calcium sulphate and calcium phosphate use potassium sulphate and sodium phosphate.
(b) Solution for nitrogen deficiency:
Instead of potassium nitrate use potassium chloride.
(c) Solution for phosphorus deficiency:
In place of calcium phosphate use calcium nitrate.
(d) Solution for potassium deficiency:
In place of potassium nitrate use sodium nitrate.
(e) Solution for iron deficiency:
Do not use ferrous sulphate.
(f) Solution for magnesium deficiency:
In place of magnesium sulphate use potassium sulphate.
Method:
1. Take seven large glass jars and make them clean thoroughly with hot water and finally with distilled water.
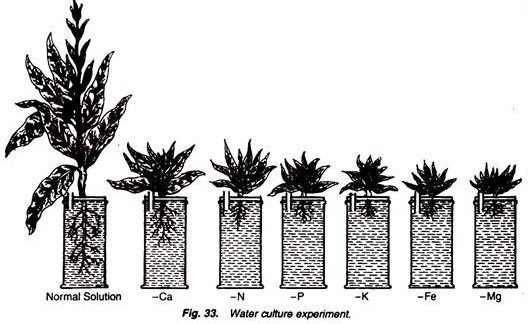
2. In one jar fill the normal Sach’s nutrient solution and in the remaining six jars, fill the solutions having the deficiency of calcium, nitrogen, phosphorus, potassium, iron and magnesium, respectively. Mark all these jars as Normal, Ca, N, P, K, Fe and Mg with glass-marking pencil (Fig. 33).
3. Take young seedlings of almost equal size of the plants (either of oat, maize, tomato or tobacco), fit them in seven different split corks and fix one split cork in each of the jar in a way that the roots of the seedlings are immersed in the solutions.
4. Wrap the jars with black paper to check the growth of algae and keep them in bright, warm conditions.
5. Change the liquid almost every day with a fresh one and note the changes for about a month.
Observations:
The growth and general health of the seedlings is absolutely normal in the normal solution while it is different, stunted or checked in many ways in solutions with the deficiency of some or other element.
Results:
The effects of the deficiency of different minerals is different in different plants.
6. Experiments on Photosynthesis:
Aim of the Experiment:
To show that carbon dioxide is necessary for photosynthesis.
Requirements:
Two bell jars, potted plant, aspirator, beakers, soda lime, caustic potash, glass plate (2), some inert material, two wide tubes ending into fine tube, grease, iodine.
Method:
1. Take two potted plants and place them in darkness for two days to make them de-starched.
2. Place the pots on glass plate and cover them with a bell jar.
3. The mouth of both the bell jars is fitted with a cork having two holes. Through one hole is inserted a wide-mouthed tube ending into fine tube and through the other hole a bent tube is fitted which remains connected with an aspirator (Fig. 35).
4. The wide-mouthed tube of one bell jar is filled with soda lime. In the bell jar place two beakers containing caustic potash.
5. The wide-mouthed tube of other bell jar is filled with some inert material like pebbles, and in this bell jar place two beakers containing water in place of caustic potash. This functions as a control.
6. Apply grease at the base of the bell jar to prevent the air to pass in, and keep both the apparatuses in sunlight for a few hours, and observe.
Observations:
Test the leaves of both the plants for starch separately. The leaves of the plant, placed under a bell jar having caustic potash in beaker and soda lime in the tube show negative test for starch while the leaves of the other bell jar (in which beakers contain water and tube is filled with pebbles) show positive test for starch.
Results:
Negative test for starch in the leaves of one plant indicates that there is no starch formation in its leaves because of the absence of CO2. All other conditions for photosynthesis (i.e., light, chlorophyll, water and temperature) are normal.
Only CO2 is not present in the surroundings of the plant because the CO2 of the air entering through the wide-mouthed tube is absorbed by the soda lime and the entering air is free from CO2. On the other hand the CO2, which is coming out in the process of respiration of plant, is absorbed by the caustic potash placed in the beakers.
The leaves of the other plant show positive test for starch because ail the essential requirements for photosynthesis, i.e., light, chlorophyll, water, temperature and also CO2, are present in its surrounding.
So, CO2 is necessary for photosynthesis.
7. Experiments on Respiration in Plants:
Aim of the Experiment:
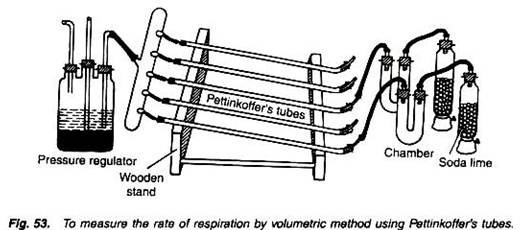
To measure and compare rate of respiration of various plant parts by volumetric method using Pettinkoffer’s tubes.
Requirements:
Jars, respiratory substrate, Pettinkoffer’s apparatus, barium hydroxide solution, wooden stand, pressure regulator (suction pump), grease, soda lime, oxalic acid, phenolphpthalein, barium carbonate, caustic potash, burette, beakers, measuring cylinder, balance with weighing box.
Method:
1. Fill the jars with soda lime and place about 100 gm. respiratory materials in U-tube chamber.
2. Now fill the long and narrow Pettinkoffer’s tubes with solution of barium hydroxide of known concentration (N/10). Place the Pettinkoffer’s tubes in such a way on a wooden stand that they are oriented obliquely.
3. Connect the tubes with a suction pump or pressure regulator.
4. Make the entire apparatus air-tight by applying grease.
5. Now allow the pressure regulator to function. Due to this the air current rushes into the jars filled with soda lime which absorbs carbon dioxide of the air. The air now passes through the plant material placed in the U-shaped respiratory chamber (Fig. 53).
6. From the U-shaped chambers, the air is now bubbled through the Pettinkoffer’s tubes filled with barium hydroxide solution.
7. For regulating a slow movement of air and bubbles through the soda lime, respiratory substrate and barium hydroxide solution, the pressure regulator is allowed to work. The air first passes through one of the Pettinkoeffer’s tube and then it is allowed to flow through the second tube.
8. Now remove the first tube and titrate its contents. Due to the presence of precipitated barium carbonate (BaCO3) the contents become turbid.
9. Measure about 25 ml. of contents of Pettinkoffer’s tube, i.e., barium carbonate and titrate it against N/10 solution of oxalic acid.
10. Phenolphthalein drops are used as indicator in the beaker containing barium carbonate and note the end point.
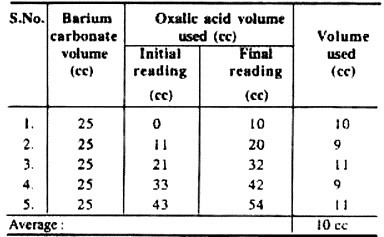
Observations and results:
Observations and results may be noted in the form of following table:
N1V1 =N2V2, where
(a) N1 = Known normality of oxalic acid.
It is calculated as follows:
Molecular weight of oxalic acid = 126
Equivalent weight 126/2 = 63
Therefore, N = 63
N/10= 6.3 gm. of oxalic acid dissolved in 1000 cc of water
So, N, = 6.3.
(b) V1 = Known volume of oxalic acid used = 10 cc
(c) N2 = Normality of barium hydroxide solution, which is to be determined.
(d) V2 = Volume of barium carbonate =25 cc
In this way N1V1 = N2V2 may be calculated as follows:
6.3 × 10 = N2× 25
Therefore, N2 = 6.3 × 10 / 25= 2.52
Conclusion:
The amount of CO2 produced by 100 gm. of given plant material (respiratory substrate) is 2.5 mg/litre in one hour. In the same way, rate of respiration of different respiratory substrates or different plant parts can be determined.
8. Experiments on Growth Rate in Plants:
Aim of the Experiment: To measure the growth rate of plant by a horizontal microscope.
Requirements:
Horizontal microscope with a vertical stand fitted with sliding linear scale, pen, plant or twig of the plant to be measured.
Method:
In horizontal microscope (Fig. 57), the optical remain in horizontal position. It is held by a vertical stand fitted with a sliding linear scale. Its optical tube can be moved both upwards and downwards with the help of a screw. With the help of a linear scale, the vertical movement can be measured.
The growth from this microscope is measured in the following manner:
1. Make a small point on the shoot apex with the help of a pen.
2. Bring this ink point in focus of the microscope by observing through its eyepiece.
3. After 24 hours again observe the same ink point which has now moved up due to the growth in the plant. Move the microscope upwards, focus it and note the distance between the initial and the final readings.
4. Note the readings daily for 10 days after a definite interval of 24 hours.
Result:
An increase in the readings is observed daily. This indicates that the plant is growing daily.
9. Experiments on Growth of Plants by Promoting Substances:
Aim of the Experiment:
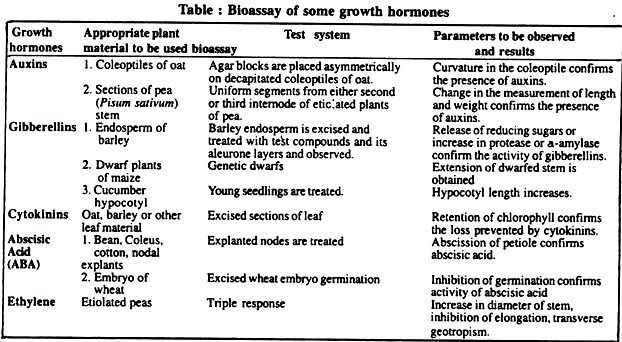
Bioassay of auxin, gibberellin, cytokinin, abscisic acid (ABA) and ethylene using appropriate plant material.
What is bioassay?
Bioassay means the quantitative determination of a substance by measuring its biological effects on e.g., growth, that is the use of an organism to test the environment, Or, it is the determination of the power of a biological product by testing its effect on an organism.
Requirements:
Appropriate plant materials or bioassay materials mentioned in following Table.
Method, observations and results:
See the following table:
10. Experiments on Biotechnology:
Aim of the Experiment:
To work out the generalized steps used in the methodology of tissue culture in a plant material.
Requirements:
Plant material (e.g. mature carrot plant), water, scalpel or razor, cork borer, sterile petri dishes, callus initiation medium (e.g. Murashige-Skoog’s medium) with 2, 4-D, shoot development medium, pot with soil.
Method:
1. Take a mature carrot plant (Fig. 2A) with its tap root intact, remove its leaves and wash its tap root thoroughly (Fig. 2B).
2. Cut the tap root into 3 or 4 pieces (Fig. 2C) with a sharp scalpel or razor.
3. Insert the cork borer into a tap root piece (Fig. 2D) and take out the desired regions of root.
4. Put such a removed tap root piece in a sterile petridish and cut it transversely into small pieces as shown in (Fig. 2E).
5. Take some callus initiation medium (e.g. Murashige-Skoog’s medium or MS medium) with 2, 4-D in a sterile petridish, place some disks or cut pieces of tap root on it and incubate for 6-8 weeks. Callus formation starts within 4-6 weeks (Fig. 2 F).
6. Transfer the calli to another petridish containing shoot development medium. Young plants with roots and shoots (Fig. 2G) start to develop within 4- 8 weeks.
7. These young plants are transferred to pots containing soil (Fig. 2 H) where they develop into mature plants (Fig. 2A).
