
The below mentioned article includes a collection of fifteen experiments on soil.
1. Experiment to measure the temperature of the soil and air:
Requirements:
Soil thermometer, ordinary thermometer (U-shaped minimum-maximum thermometer), notebook, pencil.
Method:
(a) Soil temperature:
1. Take a soil thermometer (Fig. 72), set it on the surface of the soil in sun and shade, and note the readings.

2. Burry the bulb of the soil thermometer in the soil at a depth of 10 cm for some time and note the readings at different timings.
3. Now burry the bulb at different depths, i.e., at 20 cm, 30 cm, 40 cm etc. for the same period and note the readings.
4. At different depths, note the readings both in sun and shade as in Table 4.7.

(b) Air temperature:
1. Take an ordinary U-shaped minimum-maximum thermometer (Fig. 73).

2. Observe the readings at different timings (8 a.m., 10 a.m., etc.) and at different heights, and also in sun and shade.
Tabulate your readings in the form of following Table 4.8:

2. Experiment to study the texture of given soil samples:
What is soil texture?
Soil texture mainly depends on the size of the soil particles, proportion of the various particles and on the peculiar and specific arrangement of these particles.
The designation of various kinds of soil particles mainly depends upon the diameter of the particles which can be categorized as mentioned in the following Table 4.9:

Requirements:
Different soil samples.
Method:
For knowing the soil texture a rough but easy method is to examine the soil under the thumb and the finger in moist as well as dry conditions. A hand lens may also be used for it. Different particles can be judged as follows:
1. Sand:
Particles can be easily seen. These are loose and coarse. In moist conditions, the sand can be squeezed and cast but on touching by hand the particles will separate. Size of the particles varies from 0.02 to 2.0 mm.
2. Silt:
It gives clotty appearance in dry conditions. The size of the particles ranges from 0.002 to 0.02 mm. in diameter.
3. Clay:
It is sticky when wet. It forms a long flexible ribbon when pinched between thumb and finger. The size of the clay particles is smallest (below 0.002 mm. in diameter).
3. Experiment to estimate the bulk density of the grassland and woodland soil:
Requirements:
Soil samples, khurpa or any other digging instrument, oven, measuring cylinder, physical balance.
Method:
What is Bulk Density?
The dry weight of unit volume of the soil is called its bulk density. It is expressed as gram per cm3. High bulk density is inversely proportional to the pore surface of the soil. The soils with bulk density (gm./cm3) varying between 1.1 and 1.5 are medium to fine-textured while those between 1.5 and 1.7 are coarse-textured. Alkaline soils usually have a bulk density above 1.7. The bulk density is calculated by the formula:
Bulk density (gm./cm3) = Weight of dry soil (gm.)/Volume of dry soil (cm3)
Under mentioned is the procedure to find out the bulk density of the soil:
1. Take soil samples randomly from an area from a depth of about 15 cm.
2. Dry the soil in an oven for about 24 hours at a temperature of 105°C.
3. Transfer a part of the dried soil to a measuring cylinder and determine its volume.
4. Determine the weight of the above volume of soil on a balance.
Results:
Find the bulk density of the soil by the formula mentioned above. Also determine the type of the soil by the details mentioned above.
4. Experiment to estimate the porosity of different soil samples:
Porosity:
Pores between the soil particles are of great importance for the plant growth because they contain air and water. Porosity of the soil depends upon the texture and structure of the soil, compactness of the soil and also on the organic content of the soil. It increases with the increase in the percentage of organic matter in the soil. It decreases with the decrease in the size of the soil particles. Porosity also decreases with the depth of the soil in the earth.
Requirements:
Balance, oven, soil samples, measuring cylinders, water.
Method:
1. Take some amount of different soil samples (e.g. sand, clay), put them in the oven for some time and allow them to dry.
2. Weigh 250 gm. of each oven-dry soil samples and place each of them in separate measuring cylinders.
3. Add 250 ml of water in each measuring cylinder gradually through the wall and note the level of water in each cylinder.
4. Wait for about 15 minutes and again note the water level in each cylinder. There is a fall of water level in each cylinder. Now deduct the second water level from the first one. This will give us the porosity of soil sample.
Observations:

Result:
The percent porosity of sand, silt, clay and garden soil is…,…,…, and… respectively.
5. Experiment to find out the moisture content of the soil:
Requirements:
Polythene bags, oven, khurpa (a weeding instrument), beaker, balance.
Method:
1. Take about 100 gm. of soil from the desired depth, keep it in polythene bag and bring to the laboratory.
2. Keep a definite quantity (e.g., 100 gm.) in a pre-weighed beaker and place it in the oven for 24 hours at 70°C for drying.
3. Weigh the beaker containing dry soil and calculate the moisture percentage as under :
Calculations:
Suppose:
Weight of the empty beaker = 30 gm.
Weight of the fresh soil = 100 gm.
Weight of the dry soil and beaker = 110 gm.
Weight of the dry soil = 110 – 30 = 80 gm.
Moisture contents of the soil = 100 – 80 = 20 gm.
80 gm. of the soil contains = 20 gm. of moisture
100 gm. of soil will contain = 20 × 100/80 gm.
= 25 gm. moisture
Result:
100 gm. of dry soil contains 25 gm. moisture contents.
Moisture percentage = 25%
6. Experiment to determine water-holding capacity of given soil sample:
Requirements:
Soil sample, oven, tin or brass box with perforated bottom, weighing box, weighing balance, filter paper, petri-dish.
Method:
1. Take the soil sample, crush it thoroughly and allow it to dry.
2. Take a tin or brass box with perforated bottom and weigh it.
3. Also take a filter paper and weigh it with weighing balance.
4. Put the weighed filter paper at the bottom of the tin or brass box and fill the box with soil.
5. Now place the soil-filled tin or brass box in a petri-dish containing water and wait for about 6 hours.
6. Again weigh the box containing wet soil.
7. Now put the box containing wet soil in an oven adjusted at 105°C and wait for about 24 hours.
8. Now remove this box and weigh it.
9. Now take four filter papers from the same filter paper packet used earlier, dip one of them in water and weigh it. In a similar fashion weigh other three wet filter papers and find out the average weight of water absorbed by one filter paper.
Observations:
(1) Weight of tin or brass box = 50 gm.
(2) Weight of dry filter paper = 0.12 gm.
(3) Weight of box + wet filter paper + wet soil = 142 gm.
(4) Weight of box + dry filter paper + dry soil = 122 gm.
(5) Weight of wet filter paper = 0.62 gm.
Results:
Water-holding capacity is calculated as under:
(6) Weight of wet soil = (weight of box + wet filter paper + wet soil) – (weight of box + weight of wet filter paper)
= No. (3)-No. (1+5)
= 142 gm. – (50 gm. + 0.62 gm.)
= 142 gm.-50.62 gm.
=91.38 gm.
(7) Weight of soil dried in oven = (weight of box + dry filter paper + dry soil) – (weight of box + weight of dry filter paper)
= No. 4-No. (1 + 2)
= 122 gm – (50 gm + 0.12 gm)
= 122gm-50.12gm =71.88 gm
(8) Water present in the soil = weight of wet soil – weight of soil dried in oven
= No. 6 – No. 7 =91.38 gm – 71.88gm = 19.50 gm
(9) Water-holding capacity of the soil sample
= Amount of water present in the soil (8)/Weight of soil dried in oven (7) × 100
= 19.50/71.88 × 100%
= 27.12%
7. Experiment to demonstrate different horizons of local soil profile:
Requirements:
Trowel (a small tool with a curved scoop for lifting plants or earth), pick (a tool made up of a curved iron bar with pointed ends and a wooden handle, used for breaking up hard ground or rock).
Method:
Select an undisturbed area anywhere or in your college campus and dig a long trench of about 75 cm wide and 1.5 metre deep. (Instead of trench, a narrow pit dug in the study area will also serve the same purpose).
Observations and Results:
Three horizons (A, B and C) may be traced or observed in the trench or pit starting from top or upper surface downwards. All these three horizons followed by their sub-horizons show characteristics mentioned in Table 4.11.

8. Experiment to find out the specific gravity of the soil:
Requirements:
Soil samples, oven, physical balance, measuring cylinder, distilled water, digging instrument (Khurpa).
Method:
1. Dig out the soil sample from a depth of about 10-15 cm and place it in the oven at 105°C for a few hours till a constant weight is not attained.
2. Put a part of this dried soil in a measuring cylinder and determine its volume.
3. Fill the distilled water in the measuring cylinder up to the same volume as that of the above-dried soil, and take the weight of this volume of distilled water with the help of a physical balance.
Observations and results:
Calculate the specific gravity of the soil by the following formula:
![]()
9. Experiment to determine the presence of carbonates in the given soil samples:
Requirements:
Test tube, soil samples, dil. HCl.
Method:
Take a little amount of soil in a test tube and add dil HCl. Observe the effervescence or bubbles of gas. Try to place the bubbles on an imaginary scale of 1-5. High grade of bubbles or effervescence should be recorded as 5, i.e., very high level of carbonate contents, and low grade as 1, i.e., very low carbonate contents. Count the intermediate levels from different other soil samples.
Record your results in the form of Table 4.12 given below:
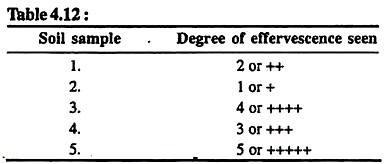
Results:
Carbonates are highest in soil sample number 5 and lowest in sample number 2.
Carbonate contents can be accurately measured by Collin’s Calcimeter.
10. Experiment to determine the presence of nitrates in the soil samples:
Requirements:
White spot plate or white cavity tile, diphenylamine, H2SO4, water, soil samples.
Method:
Take small amount of soil on a white spot plate and add only 2 drops of 0.02% diphenylamine solution in conc. H2SO4. Blue colour will be formed.
Distinguish the grades of blue colour by an imaginary scale of 1-5 and record the details in tabular form as under in Table 4.13:
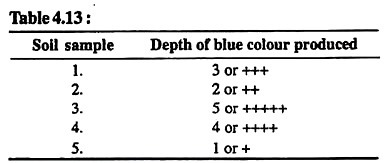
Results:
Nitrate contents are highest in soil sample No. 3 and lowest in soil sample No. 5.
11. Experiment to determine the soil pH:
What is pH?
pH is a property to know the chemical nature of soil. If a reaction is predominated by hydrogen ions it becomes acidic. Results are alkaline in the reverse condition. pH of the soil can be estimated by pH meter or pH paper. One more satisfactory way for determining pH is the use of Universal Indicator.
Requirements:
Soil, BDH Universal Indicator, test tube, water.
Method:
1. Mix the soil in some water, shake and add BDH Universal Indicator. Compare the colour of the solution with the chart on the bottle of indicator and note the pH.
2. Mix thoroughly the soil in a test tube with equal amount of barium sulphate and about 20 ml of water. Take a few drops of supernatant liquid on a porcelain tile and add equal amount of Universal Indicator, and compare the colour of the soil with the chart for pH given on the bottle of Universal Indicator.
12. Experiment to determine base deficiency of given soil samples:
Requirements:
Test tube, soil samples, alcoholic solution of ammonium thiocyanate and hydrogen peroxide.
Comber’s Test:
Shake thoroughly a little amount of soil with a saturated alcoholic solution of ammonium thiocyanate in a test tube. Let the soil settle. Add a drop of hydrogen peroxide. Red colour will develop.
The darkness of the red colour and its depth can be noted in 5 degrees in the following Table 4.14:
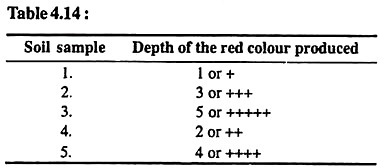
Results:
Base deficiency is minimum in soil sample number 1 and maximum in soil sample number 3.
13. Experiment to determine and compare the humus contents of polluted and unpolluted soils:
Requirements:
Crucible, physical balance, oven, hydrogen peroxide, sample of unpolluted soil (e.g., un-ploughed forest land), samples of polluted soils (e.g., soil from cultivated land with excessive amount of synthetic fertilizers, or soil from fields applied with industrial waters or municipal wastes, water, etc.)
Method:
‘Humus’ may be defined as the layer of organic matter at the top of a soil profile. It is actually the habitat of most decomposers. Several useful plant nutrients are released by humus after being decomposed by soil microorganisms, and this enhances the soil fertility. Soil pollutants readily influence the humus contents in the soil. The humus contents of soil samples give an idea of the amount or level of pollution prevailing in the soil.
It may be determined as under:
1. Weigh a dried crucible. Take 10 gm. of any soil sample in the crucible and weigh it again correctly.
2. Put the crucible in an oven for one hour at 105°C.
3. Cool the crucible and add 5 ml hydrogen peroxide in the dried soil sample. Heat the crucible again for about 15 minutes and weigh it again.
4. Repeat the above-mentioned procedure for each soil sample.
Calculate the amount of humus, percentage of humus and pollutional factors for each soil sample as under:
Weight of crucible = X gm.
Weight of crucible + soil sample = Y gm.
Weight of soil before heating = Y – X gm.
Weight of crucible + soil after adding hydrogen peroxide and again heating = Z gm.
Weight of soil after heating = Z – X gm.
Amount of humus in the soil sample
= (Y – X) – (Z – X) gm.
Percentage of humus in the soil sample
(Y – X) – (Z – X)/(Y- X) × 100
Note and compare the variation in humus contents of different samples taken from polluted and unpolluted soils. Also correlate the pollutional factors prevailing in these soils.
14. Experiment to detect some heavy metals (Cu, Fe, Cd, Zn, Cr, Pb, As and Mn) in the soil:
Requirements:
As per the test method used to detect specific metal.
Method:
1. Copper (Cu):
Take soil sample in the test tube and add HCl and then NH4OH slowly. Appearance of bluish white precipitate confirms the presence of copper in the soil.
2. Iron (Fe):
In the soil sample add HCl and K4Fe(CN)6. Appearance of deep blue colour or deep blue precipitate shows the presence of iron.
3. Cadmium (Cd):
Add NaOH and a few drops of thiocinamine in the soil sample and heat the mixture. Yellow precipitate formation confirms cadmium in the soil.
4. Zinc (Zn):
Add a few drops of K4Fe(CN)6 on the soil sample. Appearance of green colour confirms zinc in the soil.
5. Cromium (Cr):
Boil the soil sample with bromine water and then add diphenylamine (prepared in conc. H2SO4). Heat the mixture. Blue colour formation indicates the presence of cromium in the soil sample.
6. Lead (Pb):
Add a few drops of conc. H2SO4 on the soil sample. If white precipitate appears it confirms the presence of lead in the soil.
7. Arsenic (As):
In the soil sample add a few drops of conc. HNO3 and almost equal drops of ammonium molybdate. Formation of canary yellow precipitate confirms the arsenic in the soil.
8. Manganese (Mn):
Add conc. HN03 and lead peroxide in the soil sample and boil the mixture for about 10 minutes. If the liquid becomes violet or purple coloured, it shows the presence of manganese in the soil.
15. Experiment to test the presence of phosphate, sulphate and chloride in the soil:
Requirements:
Soil samples, conical flask, distilled water, beakers, test tubes, sulphuric acid, silver nitrate, hydrochloric acid (conc.), burner, BaCl2, ammonium molybdate, nitric acid (conc.), NH4NO3.
Preparation of water extract:
Take about 250 gm. of soil sample in a conical flask, add 500 ml distilled water and shake it thoroughly. Wait for about 10 hours. Soluble inorganic salts will be dissolved in water during this period. Pour the water slowly in beaker and collect the filterate. This is called water extract.
1. Phosphate:
Take 10 ml of water extract in a test tube and add in it a few drops of ammonium molybdate solution, nitric acid (conc.) and NH4N03. Development of yellow colour indicates the presence of phosphate in the soil.
2. Sulphate:
Take about 20 ml of water extract in a beaker and add in it 2 to 5 ml hydrochloric acid (conc.). Boil it and then add BaCl2 solution. Development of white precipitate indicates the presence of sulphates in the soil.
3. Chloride:
Take about 20 ml of water extract in a beaker and neutralize its carbonate and bicarbonate by adding about 10 ml N/10 H2SO4. Add silver nitrate to the solution. Appearance of white precipitate indicates the presence of chlorides in the soil.