The below mentioned article includes a collection of ten experiments on photosynthesis for high school.
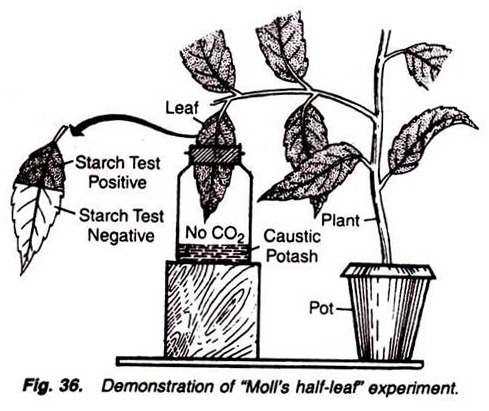
1. Experiment to demonstrate Moll’s half-leaf experiment for showing that CO2, light, chlorophyll and water are necessary requirements for photosynthesis:
Requirements:
A potted plant, caustic potash, wide- mouthed bottle, iodine, split cork, water.
Method:
1. De-starch a potted plant by putting it in complete darkness for two days.
2. Fill partly a wide-mouthed bottle with strong solution of caustic potash and fit a split cork on its mouth.
3. Insert about half of the portion of a leaf of the de-starched plant into the bottle through the split cork (Fig. 36).
4. Place the whole apparatus in light after applying grease on the upper portion of split cork, and test the leaf for stach after about 10 hours.
Observations:
Portions of the leaf inside the bottle as well as in between the split cork show negative test for starch indicating the absence of photosynthesis while the portions outside the split cork show positive test for starch indicating the presence of process of photosynthesis in this region.
Results:
Negative starch test by the leaf portion present inside the bottle indicates that process of photosynthesis is absent in this region. This portion of leaf is getting all the essential requirements, i.e., light, chlorophyll and water except the CO2 because the latter is absorbed by the caustic potash. Thus, it can be concluded that CO2 is necessary for this process.
Negative test of starch, which is also shown by the portion of the leaf present in between the split of the split cork, can be explained that it is due to the lack of CO2 and light, thus indicating that both of them are essential requirements.
Positive test of starch shown by the portions of the leaf present outside the bottle indicates that photosynthesis process is continuously going on there because all the essential requirements, i.e., light, chlorophyll, water and CO2 are readily available to this portion.
That the chlorophyll is also an essential requirement for photosynthesis can be shown by testing starch in a variegated leaf. Only green portions of the leaf show positive starch test.
2. Experiment to demonstrate that oxygen is evolved during the process of photosynthesis:
Requirements:
Beaker, water, test tube, funnel, Hydrilla plant.
Method:
1. Fill the beaker with the water and take an aquatic plant, such as Hydrilla, in the beaker.
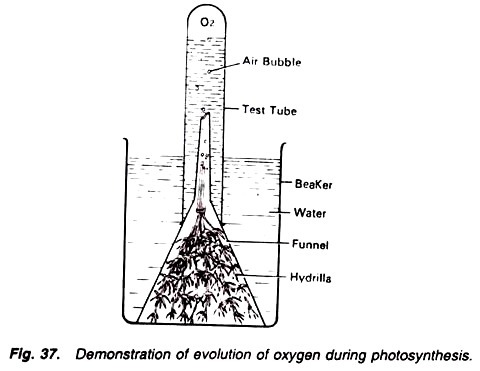
2. Cut the bases of the plants, tie them with a thread and cover them with an inverted funnel in such a fashion that the cut ends of plants are towards the neck of the funnel (Fig. 37).
3. Fill a test tube with the water and invert it on the upper end of the funnel.
4. Keep the whole apparatus in sunlight and observe for some time.
Observations:
From the cut ends of the plant some bubbles are coming out continuously and they are collected at the top of the test tube by displacing the water. On testing this gas it is found that it is oxygen.
Results:
The liberated gas is oxygen and it is evolved due to the photolysis of water under the process of photosynthesis. The liberated gas comes in the intercellular spaces and ultimately evolves out through the stomata.
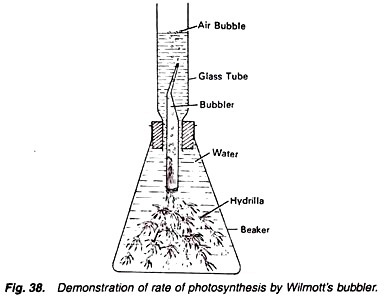
3. Experiment to compare the rate of photosynthesis under different conditions with the help of Wilmott’s bubbler:
Requirements:
Wilmott’s bubbler, water, Hydrilla, vaseline, papers of red, blue and green colours, heater, sodium bicarbonate, thermometer, etc.
Method:
1. Fill a Wilmott’s bubbler with pond water.
2. Cut the bases of the Hydrilla plants, tie them with a thread and insert them in the narrow tube of the bubbler in such a fashion that their cut ends are towards the upper side as shown in the Fig. 38.
3. Add some definite quantity of sodium bicarbonate in the water and note the number of bubbles coming out in definite time.
4. Increase a definite quantity of sodium bicarbonate with definite interval and note the increase or decrease in the number of bubbles.
5. Again fix up the apparatus in the same way as discussed above. But instead of adding sodium bicarbonate, keep the whole apparatus in sunlight and shade with definite intervals and note the number of bubbles in a definite time.
6. Fix up the apparatus afresh and now cover the bubbler with red paper and note the number of bubbles in definite time. Take also the readings of bubbles covering the bubbler with green and blue coloured papers in a definite time. Again fix up the apparatus afresh and now instead of adding any substance or covering the bubbler with coloured papers, keep it near the electric heater. Note the readings in different temperatures.
Observations:
Arrange all readings of different conditions in the form of tables as follows:
Results:
Table I indicates that by adding sodium bicarbonate in the water the number of bubbles increases. This indicates that photosynthesis increases. Sodium bicarbonate is added for increasing the amount of CO2 in the water and so it can be concluded that the rate of photosynthesis increases by increasing the quantity of CO2, but only till the light or some other factor starts to act as a limiting factor.
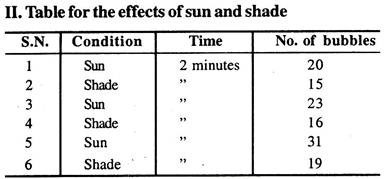
Observations of the Table II Indicate that the number of bubbles is more in sunlight than in shade, and so it can be said that photosynthesis is more in sunlight in comparison to shade.
Table III shows that the photosynthesis is highest in red light while lowest in green light.
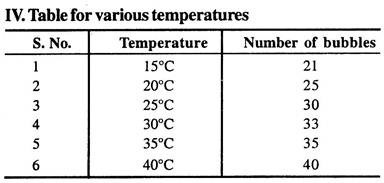
With the observations of Table IV, it can be concluded that the rate of photosynthesis increases by increasing the temperature. Too much increase in temperature will show negative effects on photosynthesis and ultimately the plant will die in high temperature.
4. Experiment to show the effect of different wavelengths of light during the process of photosynthesis:
Requirements:
A large ‘Ganong’s light screen’-like box in which the leaf can be inserted, glass top covered with blue, green and red colours, plant twig, stand, iodine, etc.
Method:
1. Place a potted plant in darkness for about 24 hours. It will make its leaves de-starched.
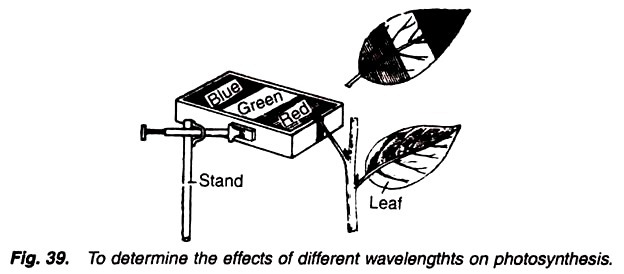
2. Fix a de-starched leaf below the glass top of the box and keep the apparatus in sunlight (Fig. 39).
3. Detach the leaf after a few hours. The chlorophyll is removed.
4. Stain the leaf with iodine to test for the presence of starch.
5. Compare the intensity of starch in the three parts of the leaf.
Observations:
The leaf part receiving green light shows negative staining for the starch.
The leaf part receiving red light is darkly-stained while that receiving blue light is next in the order.
Results:
1. Negative staining in the green region indicates that photosynthesis process has not taken place in this region. So, green wavelength is ineffective in photosynthesis.
2. Darkest staining in the red region indicates that maximum photosynthesis has taken place in this region. And this has finally resulted in the largest accumulation of starch in this region.
3. Second darkly-stained region is the blue region of the leaf. This indicates that photosynthesis has taken place in this region also, but it happened at a lower rate than that of red region.
So, red wavelength is most effective, the blue wavelength comes next in order and the green is least effective.
5. Experiment to determine the amount of chlorophyll ‘a’, chlorophyll ‘b’ and total chlorophyll in a given plant tissue:
Requirements:
Fresh green plant material (e.g., spinach leaves), mortar, pestle, 80% acetone, centrifuge.
Method:
The amount of chl ‘a’, chl ‘b’ and total chlorophyll is determined by the under mentioned method proposed by Anderson and Boardman (1964):
1. Take known amount of fresh green plant material, crush it and dissolve it in 80% acetone with the help of a mortar and pestle.
2. Centrifuge the samples of the so-formed pulpy material and take the supernatant.
3. Make the final volume of each sample to 5 ml with the help of 80% acetone.
4. Record the optical density (O.D.) for each sample at two wavelengths, i.e., 663 nm and 645 nm.
Calculations and results:
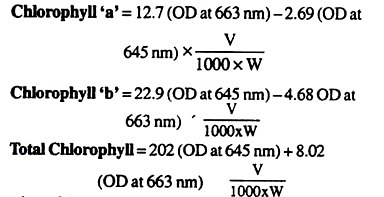
Amounts of chlorophyll ‘a’, chlorophyll ‘b’ and total chlorophyll are calculated according to the following formulae:
where OD = Optical density
V = Final volume of supernatant in ml
W = Fresh weight of the sample in grams.
Chlorophyll ‘a’, chlorophyll ‘b’ and total chlorophyll amounts are expressed in terms of mg/gm. of tissue.
6. Experiment to demonstrate that carbon dioxide enters the leaf through the stomata:
Requirements:
A de-starched plant having stomata only on lower surface of leaves, vaseline, beaker, water, iodine, soft rag.
Method:
1. Cut two leaves from such a de-starched plant in which the stomata are present only on the lower surface.
2. Apply vaseline on the lower surface of one leaf and on the upper surface of the other leaf.
3. Dip the petioles of both the leaves in water in a beaker.
4. Place the beaker, along with the leaves, in bright light for at least four hours, and then wipe off as much vaseline as possible with a soft rag. Care should be taken so that the leaf is not damaged during wiping of the vaseline.
5. Test for starch by the iodine method.
Observations and results:
The leaf, on which vaseline was applied on the upper surface, shows positive test for starch by becoming blue coloured. Therefore, the CO2 entered the leaf through the stomata present on its lower surface and the starch was formed.
On the other hand, the leaf, on which the vaseline was applied on the lower surface, shows negative test for starch, i.e., blue colour does not appear. It is because the stomata were present only on the lower surface. They were blocked due to vaseline application. Therefore, CO2 could not enter the leaf, and hence no starch formation takes place.
This shows that CO2 enters the leaf through stomata during photosynthesis.
7. Experiment to demonstrate that photosynthesis causes increase in dry weight:
Requirements:
A de-starched large-leaved plant, cork borer, wooden block, oven, weighing balance.
Method:
1. With the help of a sharp cork borer punch out about 10 pieces from the half part of a de-starched leaf, still attached to the plant (cork borer should be used against a wooden block, and care should be taken so that large veins are not injured during punching).
2. Put these punched pieces in an oven at 86°C and determine their dry weight.
3. Place the plant in sunlight for 8-10 hours, and then take the similar number of punching’s from the other half of the leaf. Determine the dry weight of these punching’s also by putting them in oven at 86°C.
Observations and results:
There is an increase in the dry weight of the similar number of punching’s taken from the plant which was kept in sunlight for 8-10 hours. This indicates that when the destrached plant was kept in sunlight, photosynthesis took place, and resulted in an increase in dry weight of the plant.
8. Experiment to demonstrate the dye-reduction by chloroplast:
Requirements:
Spinach or gram leaves, grinding medium, grinder, centrifuge, test tube, linen, dye, black paper, etc.
Method:
1. Take about 5 gm. of spinach or gram leaves and grind them in about 20 ml of grinding medium (0.25 M NaCl, 0.1M K2HPO4).
2. Filter in through very thin layers of linen.
3. Centrifuge in at 3000 to 4000 rpm.
4. Now take the pellet and suspend it in 50 ml. of the grinding medium.
5. Pour about 5 ml of the suspension in two separate test tubes.
6. Now add 2 drops of 2,6-Dichlorophenol indophenol dye in both the test tubes.
7. Cover one of the test tube with black paper so that it may not get light while the other tube is exposed to light. (When the tube is exposed to light it must be placed in an ice cold water bath so that chloroplasts may not be damaged).
Observations and results:
The dye is reduced only in one of the tube which is exposed to light; while in the other tube which is covered with a black paper the dye remains blue-coloured.
9. Experiment to demonstrate the starch in chloroplast:
Requirements:
Chloral hydrate, iodine, Spirogyra filaments or Moss leaves, slides.
Method:
1. Take a slide and put either a few Moss leaves or Spirogyra filaments on it.
2. Treat the leaves or filaments with chloral hydrate and iodine.
Observations:
Starch grains are stained blue. Result. Due to the application of the reagent the chlorophylls and starch grains are separated. The starch grains turn blue on addition of iodine, indicating the fact that starch is present in chloroplast.
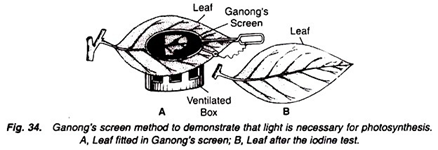
10. Experiment to demonstrate that light is necessary for the process of photosynthesis:
Requirements:
Ganong’s light screen, a potted plant and iodine.
Method:
1. Take a potted plant and make its leaves destrached by keeping it in dark for one or two days.
2. Fix a leaf of this plant in between the Ganong’s screen.
3. In the black paper or black tin foil disc of the screen, cut a pattern of some kind (like P) and fix it on the screen.
4. Keep the whole apparatus in sunlight.
Due to this light screen, some parts of the leaf are covered whereas other remaining parts are exposed to light.
5. Remove the leaf from the screen after a few hours, and test for starch with the help of iodine.
Observations
In the region of the letter ‘P’ the leaf shows positive iodine test (Fig. 34).
Results:
The observations indicate that the iodine test is positive only in the regions of the leaf which were exposed to sunlight (P) while on the other hand the unexposed regions show negative iodine test for starch. Because the ultimate product of photosynthesis is starch, hence it can be concluded that it is formed only in those regions which remain exposed to sunlight and not in others. So, light is essential for photosynthesis.
